
Run Docker on a VPS safely: a server where only an HTTPS gateway faces the internet and the database stays locked inside

How to Run Docker on a VPS and Keep It Safe in Production

Table of Contents

Your Compose app runs on your laptop, and on a new server docker compose up -d starts it just as easily. To run Docker on a VPS, all you need is a Linux server with its own kernel and root access, which is what VPS hosting gives you. The trouble comes later: a database port published the way it was on your laptop is open to the whole internet, even with UFW switched on.

This guide takes one tested path from a fresh server to a Compose stack you can leave running. On the way, you set up HTTPS, a database nobody outside can reach, rotated logs, restored backups, and updates you can roll back. N6 Cloud ran every step on a new VPS and checked the firewall from a separate computer, so the output you see is real.

What you’ll need

  • An unmanaged KVM VPS with root access (the next section explains why KVM)
  • Ubuntu 26.04 LTS (22.04 and 24.04 work too, with one line changed in the install step)
  • SSH key access from your computer
  • A domain name whose DNS records you can edit
  • Time for DNS records to update

How this guide was tested: the server was a 2 vCPU, 4 GB VPS in a Western Canada data centre. It ran Ubuntu 26.04 LTS, Docker Engine 29.9.3, and Docker Compose v5.7.0. Addresses and hostnames in the commands and output are replaced with documentation examples such as 203.0.113.10 and example.com.

Checking a VPS before installing Docker: a server's KVM platform, its own kernel, root access and memory, inspected one by one

Before You Start: Is Your VPS Ready for Docker?

A Docker VPS is a virtual server with root access and its own Linux kernel, where Docker Engine runs your containers. Two questions decide whether yours is ready: whether it can run Docker, which depends on how the server is built, and how much memory your stack will use. Both are quick to answer before you install anything.

What Docker Needs From a Server, and When a VPS Beats a PaaS

The kernel matters because containers share the host’s kernel instead of carrying an operating system. A KVM VPS is a full virtual machine with its own kernel, so Docker works on it, and the guide to how containers differ from virtual machines explains why. A container VPS (OpenVZ or LXC) shares its host’s kernel, so Docker runs on one only if the provider has set it up for that (LXC calls this nesting). To check yours, run systemd-detect-virt: kvm means Docker will install normally. Shared hosting can’t run Docker, because you never get root access.

A managed platform as a service (PaaS) deploys your app from Git and looks after the server for you. A VPS gives you full control and a fixed monthly bill, and in return the updates, backups, and security are what an unmanaged VPS leaves to you. Choose an unmanaged VPS for this guide, because a managed one usually ships with a control panel that expects to own the web server, ports, and firewall.

How Much VPS Do You Need? Memory Measured by Stack

For one app with its database, or one WordPress site, 2 GB of RAM is enough, and 4 GB leaves room for several stacks with real data. N6 Cloud measured common stacks on the 4 GB test server with docker stats, each alone and then all together. Table 1 gives the medians in MiB (1 MiB is about 1.05 MB), with ranges in brackets. “Whole server” is the used figure from free -m, so it includes Ubuntu and Docker.

Stack Containers Container memory, idle Container memory, light load Whole server, idle Whole server, light load
Docker running, no containers
Not measured
441 (438 to 441)
Not measured
Static site (Nginx)
1
3.7
4.1 (4.1 to 4.2)
447 (439 to 450)
502 (499 to 516)
Node.js app alone
1
14.7
18.9 (18.8 to 18.9)
451 (450 to 452)
572 (541 to 585)
Node.js app plus Postgres 18
2
44
63 (61 to 70)
501 (500 to 502)
572 (569 to 581)
WordPress plus MariaDB
2
331
387 (360 to 410)
605 (603 to 605)
718 (654 to 748)
All four at once, plus Caddy and a second site
8
467 (466 to 467)
468
811 (808 to 813)
853 (848 to 861)

The general approach to working out how much RAM your VPS needs applies here. One rule covers it: keep the whole-server figure under load below half your RAM, leaving the rest for growth and the disk cache. Every database here held 100,000 short rows at most, and database memory grows with data, so treat those rows as floors. On your own server, run free -m while the stack is busy, and move up a size when “used” stays above that line.

Setting up a new VPS: logging in with an SSH key, putting a UFW firewall around it, then installing Docker Engine

Set Up Your VPS and Install Docker the Right Way

Secure the server first, then install Docker Engine and Compose from Docker’s own apt repository. Docker adds firewall rules of its own, so it’s easier to see what it changed when the basics are already in place. The guide to locking down a new Ubuntu server explains each step in more depth, and the order below keeps you from locking yourself out. Start by updating the packages with sudo apt update and sudo apt upgrade. Then, logged in as root, create a sudo user called deploy and copy root’s SSH key to it:

				
					adduser --disabled-password --gecos "" deploy
usermod -aG sudo deploy
install -d -m 700 -o deploy -g deploy /home/deploy/.ssh
install -m 600 -o deploy -g deploy /root/.ssh/authorized_keys /home/deploy/.ssh/authorized_keys


The new user logs in with your key but has no password yet, and sudo asks for one, so set it with passwd deploy. Now open a second terminal on your computer, log in with ssh [email protected], and run sudo whoami, which should print root. Keep the root session open until that works. From here on, everything runs as deploy, starting with the firewall:

				
					sudo apt-get install -y ufw
sudo ufw allow OpenSSH
sudo ufw allow 80,443/tcp
sudo ufw --force enable
sudo ufw status verbose


N6 Cloud’s Ubuntu 26.04 VPS image didn’t include UFW or iptables, so the first line installs both. The status should show “Default: deny (incoming)” with 22, 80, and 443 allowed over IPv4 and IPv6. The image also ships /etc/ssh/sshd_config.d/50-cloud-init.conf, which turns password logins on. SSH keeps the first value it reads and reads that folder in name order, so your own file has to sort first:

				
					printf "PermitRootLogin no\nPasswordAuthentication no\nKbdInteractiveAuthentication no\n" | sudo tee /etc/ssh/sshd_config.d/00-hardening.conf
sudo sshd -t && sudo systemctl reload ssh
sudo sshd -T | grep -E "passwordauth|permitroot"


A file called 99-hardening.conf would lose the password setting to the cloud-init file without any error, which is why you check with sshd -T. Because you confirmed the deploy login first, this step can’t lock you out. Test one more new login before you close your sessions.

Install Docker Engine and Compose From Docker’s Own Repository

Use Docker’s apt repository: it’s the first method Docker’s install page lists after Docker Desktop, upgrades happen only when you run apt, and the config files land where every guide expects them. Docker’s page starts by removing unofficial packages such as Ubuntu’s docker.io, which a fresh Ubuntu server usually doesn’t have (the test server had none). The commands below follow Docker’s official installation guide, with the Ubuntu code name and processor type written out instead of looked up.

				
					sudo apt-get update
sudo apt-get install -y ca-certificates curl
sudo install -m 0755 -d /etc/apt/keyrings
sudo curl -fsSL https://download.docker.com/linux/ubuntu/gpg -o /etc/apt/keyrings/docker.asc
sudo chmod a+r /etc/apt/keyrings/docker.asc
sudo tee /etc/apt/sources.list.d/docker.sources <<'EOF'
Types: deb
URIs: https://download.docker.com/linux/ubuntu
Suites: resolute
Components: stable
Architectures: amd64
Signed-By: /etc/apt/keyrings/docker.asc
EOF
sudo apt-get update
sudo apt-get install -y docker-ce docker-ce-cli containerd.io docker-buildx-plugin docker-compose-plugin


After adding Docker’s signing key and repository, the block installs Docker Engine, the docker command, the containerd runtime, Buildx, and the Compose plugin. The Suites: line is Ubuntu’s code name: resolute is 26.04, so use noble on 24.04 and jammy on 22.04. The Architectures: line is amd64 on an Intel or AMD server and arm64 on an ARM one, and dpkg --print-architecture tells you which. Compose is a plugin, so the command is docker compose, not the older docker-compose.

				
					sudo docker run hello-world
docker compose version


hello-world downloads a tiny image and runs it, which proves that the daemon, the runtime, and the link to Docker Hub all work. Docker also starts at boot from now on, so your containers can come back after a reboot. The other two methods on Docker’s page are worth avoiding. Docker calls its convenience script “only recommended for testing and development environments”. The snap package is built by Canonical, “not endorsed or published by Docker, Inc.” It reads its settings from /var/snap/docker/current/config/daemon.json, so this guide’s changes to /etc/docker/daemon.json would have no effect. Remove it if snap list shows one.

The docker Group Is Root Access: Know What You’re Granting

Adding a user to the docker group gives that user root on the whole server, so do it only for someone who already has sudo. The Docker daemon runs as root and does whatever its socket asks, and a container can mount any folder on the host and write there as root. Docker’s post-installation docs say it plainly: “The docker group grants root-level privileges to the user.”

N6 Cloud’s test showed it with a throwaway user called ciuser, who had no sudo rights and got “Permission denied” when listing /root. As ciuser, one docker run --rm -v /root:/host alpine:3.24.4 touch /host/docker-group-proof created a root-owned file inside /root, and a mount of /etc could just as easily have given that user full sudo rights. So use sudo docker, as this guide does, or add only your own admin user to the group, never an app or CI user. The same applies to the SSH user behind a docker context on your laptop.
A Docker Compose file moving from a laptop to a live server, where it starts Caddy, the app and Postgres as connected containers

From docker-compose.yml on Your Laptop to a Live Server

To deploy a Docker Compose app to a VPS, put your project on the server, adjust the Compose file, add a Caddyfile and DNS records, and run docker compose up -d. As deploy, clone your repository into a project folder with git clone, followed by your repository’s address and the folder name (a private repository needs a deploy key or access token). The test used /home/deploy/myapp, and Compose names every network, container, and volume after the folder, so the database volume became myapp_db_data. The app image is then built on the server from your own Dockerfile (build: .).

A Docker Compose production file differs from a laptop one in five ways: a private network for the database, healthchecks that set the start order, restart policies, secrets in .env, and pinned image versions. This is the test’s compose.yaml, for a Node.js app with Postgres, Caddy in front, and a static site. Compose also reads docker-compose.yml, so if you keep that name, use it in the update step later.
				
					services:
  caddy:
    image: caddy:2.11.9
    restart: unless-stopped
    ports:
      - "80:80"
      - "443:443"
    volumes:
      - ./Caddyfile:/etc/caddy/Caddyfile:ro
      - caddy_data:/data
      - caddy_config:/config
    networks:
      - web
    depends_on:
      - app
      - site

  app:
    build: .
    image: myapp:v1
    restart: unless-stopped
    env_file: .env
    depends_on:
      db:
        condition: service_healthy
    networks:
      - web
      - backend
    healthcheck:
      test: ["CMD", "wget", "-qO-", "http://127.0.0.1:3000/healthz"]
      interval: 10s
      timeout: 3s
      retries: 3

  site:
    image: nginx:1.30.6-alpine
    restart: unless-stopped
    volumes:
      - ./site:/usr/share/nginx/html:ro
    networks:
      - web

  db:
    image: postgres:18.6
    restart: unless-stopped
    env_file: .env
    volumes:
      - db_data:/var/lib/postgresql
    healthcheck:
      test: ["CMD", "pg_isready", "-U", "appuser", "-d", "appdb"]
      interval: 5s
      timeout: 3s
      retries: 10
    networks:
      - backend

networks:
  web:
  backend:
    internal: true

volumes:
  db_data:
  caddy_data:
  caddy_config:
				
			
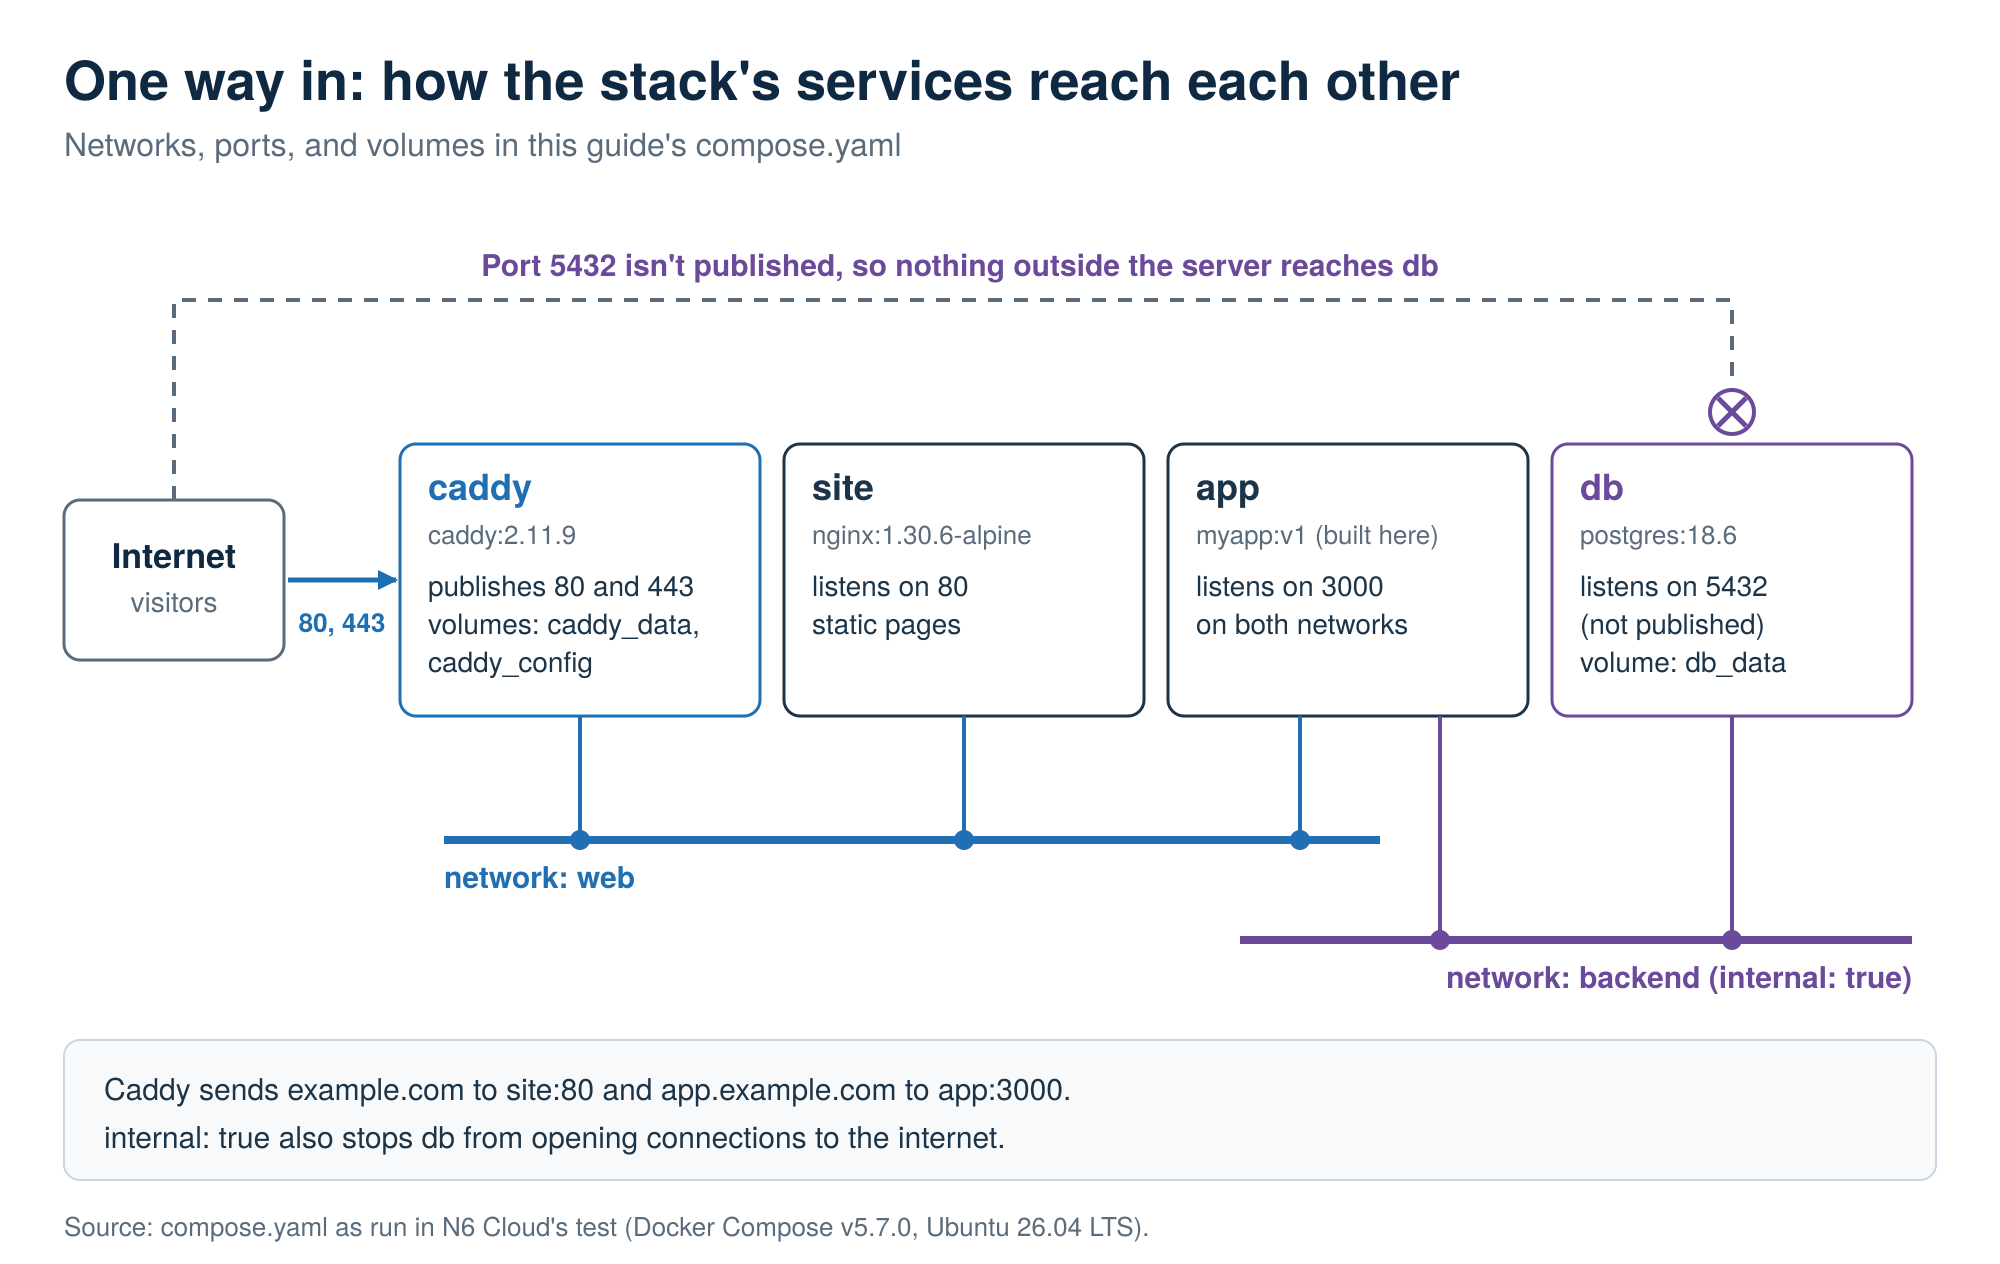
Docker Compose stack on a VPS: Caddy publishes ports 80 and 443, the app joins two networks, and Postgres sits on an internal network with no published port
Figure 1. Only Caddy faces the internet, and only the app can reach the database.

As Figure 1 shows, internal: true cuts the backend network off from the outside, so only the app, which joins both networks, can reach the database. It reaches it at the host name db, the service’s name. The depends_on setting with condition: service_healthy holds the app back until pg_isready says Postgres is answering, and restart: unless-stopped brings every container back after a crash or a reboot.

Three parts of the file assume things about your project. The app’s healthcheck runs wget inside the container, which Alpine-based images such as the test’s Node.js image include. It expects your app to answer on port 3000 at a /healthz route, so change the test line if yours differs. The site service serves static pages from a site folder next to compose.yaml. If you have no static site, delete the site service, the - site line under Caddy’s depends_on, and the example.com block in the Caddyfile below.

The .env file holds the database settings for both Postgres and the app, with these keys:

				
					POSTGRES_USER=appuser
POSTGRES_DB=appdb
POSTGRES_PASSWORD=change-me
PGHOST=db
PGUSER=appuser
PGDATABASE=appdb
PGPASSWORD=change-me


Replace both change-me values with the same long random password. The user and database names must match the healthcheck and the backup commands later (appuser and appdb), so change them everywhere or nowhere. Create the file on the server, make it readable only by you with chmod 600 .env, and list it in .gitignore. Pin image tags such as postgres:18.6 rather than latest, which can jump a major version under you. For Postgres 18, mount the volume at /var/lib/postgresql, not at the /var/lib/postgresql/data path older tutorials use.

Before the first start, point an A record (IPv4) and an AAAA record (IPv6) for each hostname at the server, because Caddy asks Let’s Encrypt for certificates as soon as it starts. Check the records from the server with getent ahosts app.example.com. Caddy reads its routes from a Caddyfile in the project folder. This one serves two sites, which is how you host several websites on one VPS:

				
					example.com {
	reverse_proxy site:80
}

app.example.com {
	reverse_proxy app:3000
}


Caddy finds site and app by service name on the web network. With everything in place, build the app image with sudo docker compose build app, so Compose doesn’t look for myapp:v1 on Docker Hub first. Then start the stack from the project folder and check it:

				
					sudo docker compose up -d
sudo docker compose ps


Only Caddy’s line shows host addresses (0.0.0.0 and [::]), so only its ports are published, while db shows 5432/tcp and is reachable only inside Docker. That makes docker compose ps a quick check for any port you didn’t mean to publish. After sudo systemctl reboot, all four containers came back on their own, and the site answered on HTTPS within a few seconds of Docker starting. A restart policy acts only when a container exits, though: when the test broke the app’s health endpoint, the container stayed (unhealthy) with no restart, so have your app exit when it can’t recover.

Make It Production-Ready: HTTPS, Firewall, Logs, and Backups

The stack is live, and four things make it safe to leave alone: self-renewing HTTPS, a firewall that blocks what you think it blocks, logs that can’t fill the disk, and tested backups. Each fixes a common way Docker servers fail in their first months, and the backup section also covers safe updates and rollbacks. Check the firewall before any real data goes into the database.

Reverse Proxy With Automatic HTTPS Using Caddy

Caddy is a reverse proxy: it takes every request on ports 80 and 443 and passes it to the right container by hostname. It also gets, installs, and renews Let’s Encrypt certificates for every name in its Caddyfile, with no cron jobs. In N6 Cloud’s test, with the images already downloaded, both names answered over HTTPS about 18 seconds after docker compose up -d. Plain HTTP got a 308 Permanent Redirect to HTTPS, and each certificate was valid for 90 days. Keep 80 and 443 open in UFW as well. Visitors who connect over IPv6 reach Caddy through UFW’s rules, as the next section explains, and in the test Let’s Encrypt checked both names over IPv6 on port 80.

Caddy keeps its certificates and account in /data, which is why that folder sits on the caddy_data volume. Lose it and Caddy requests every certificate again, and Let’s Encrypt allows only five for the same set of names in seven days. Caddy’s docs warn that hitting a limit can block HTTPS for up to a week, so while you experiment, point Caddy at Let’s Encrypt’s staging endpoint with its acme_ca option.

The Firewall Trap: Why Docker Bypasses UFW

UFW can show a port as closed while Docker publishes it to the internet. When you publish a port, Docker rewrites each incoming packet’s destination to the container’s address (DNAT, destination network address translation) and forwards it through rules of its own. The packet never reaches the INPUT chain where UFW’s rules sit, as Figure 2 shows next to the path SSH takes.
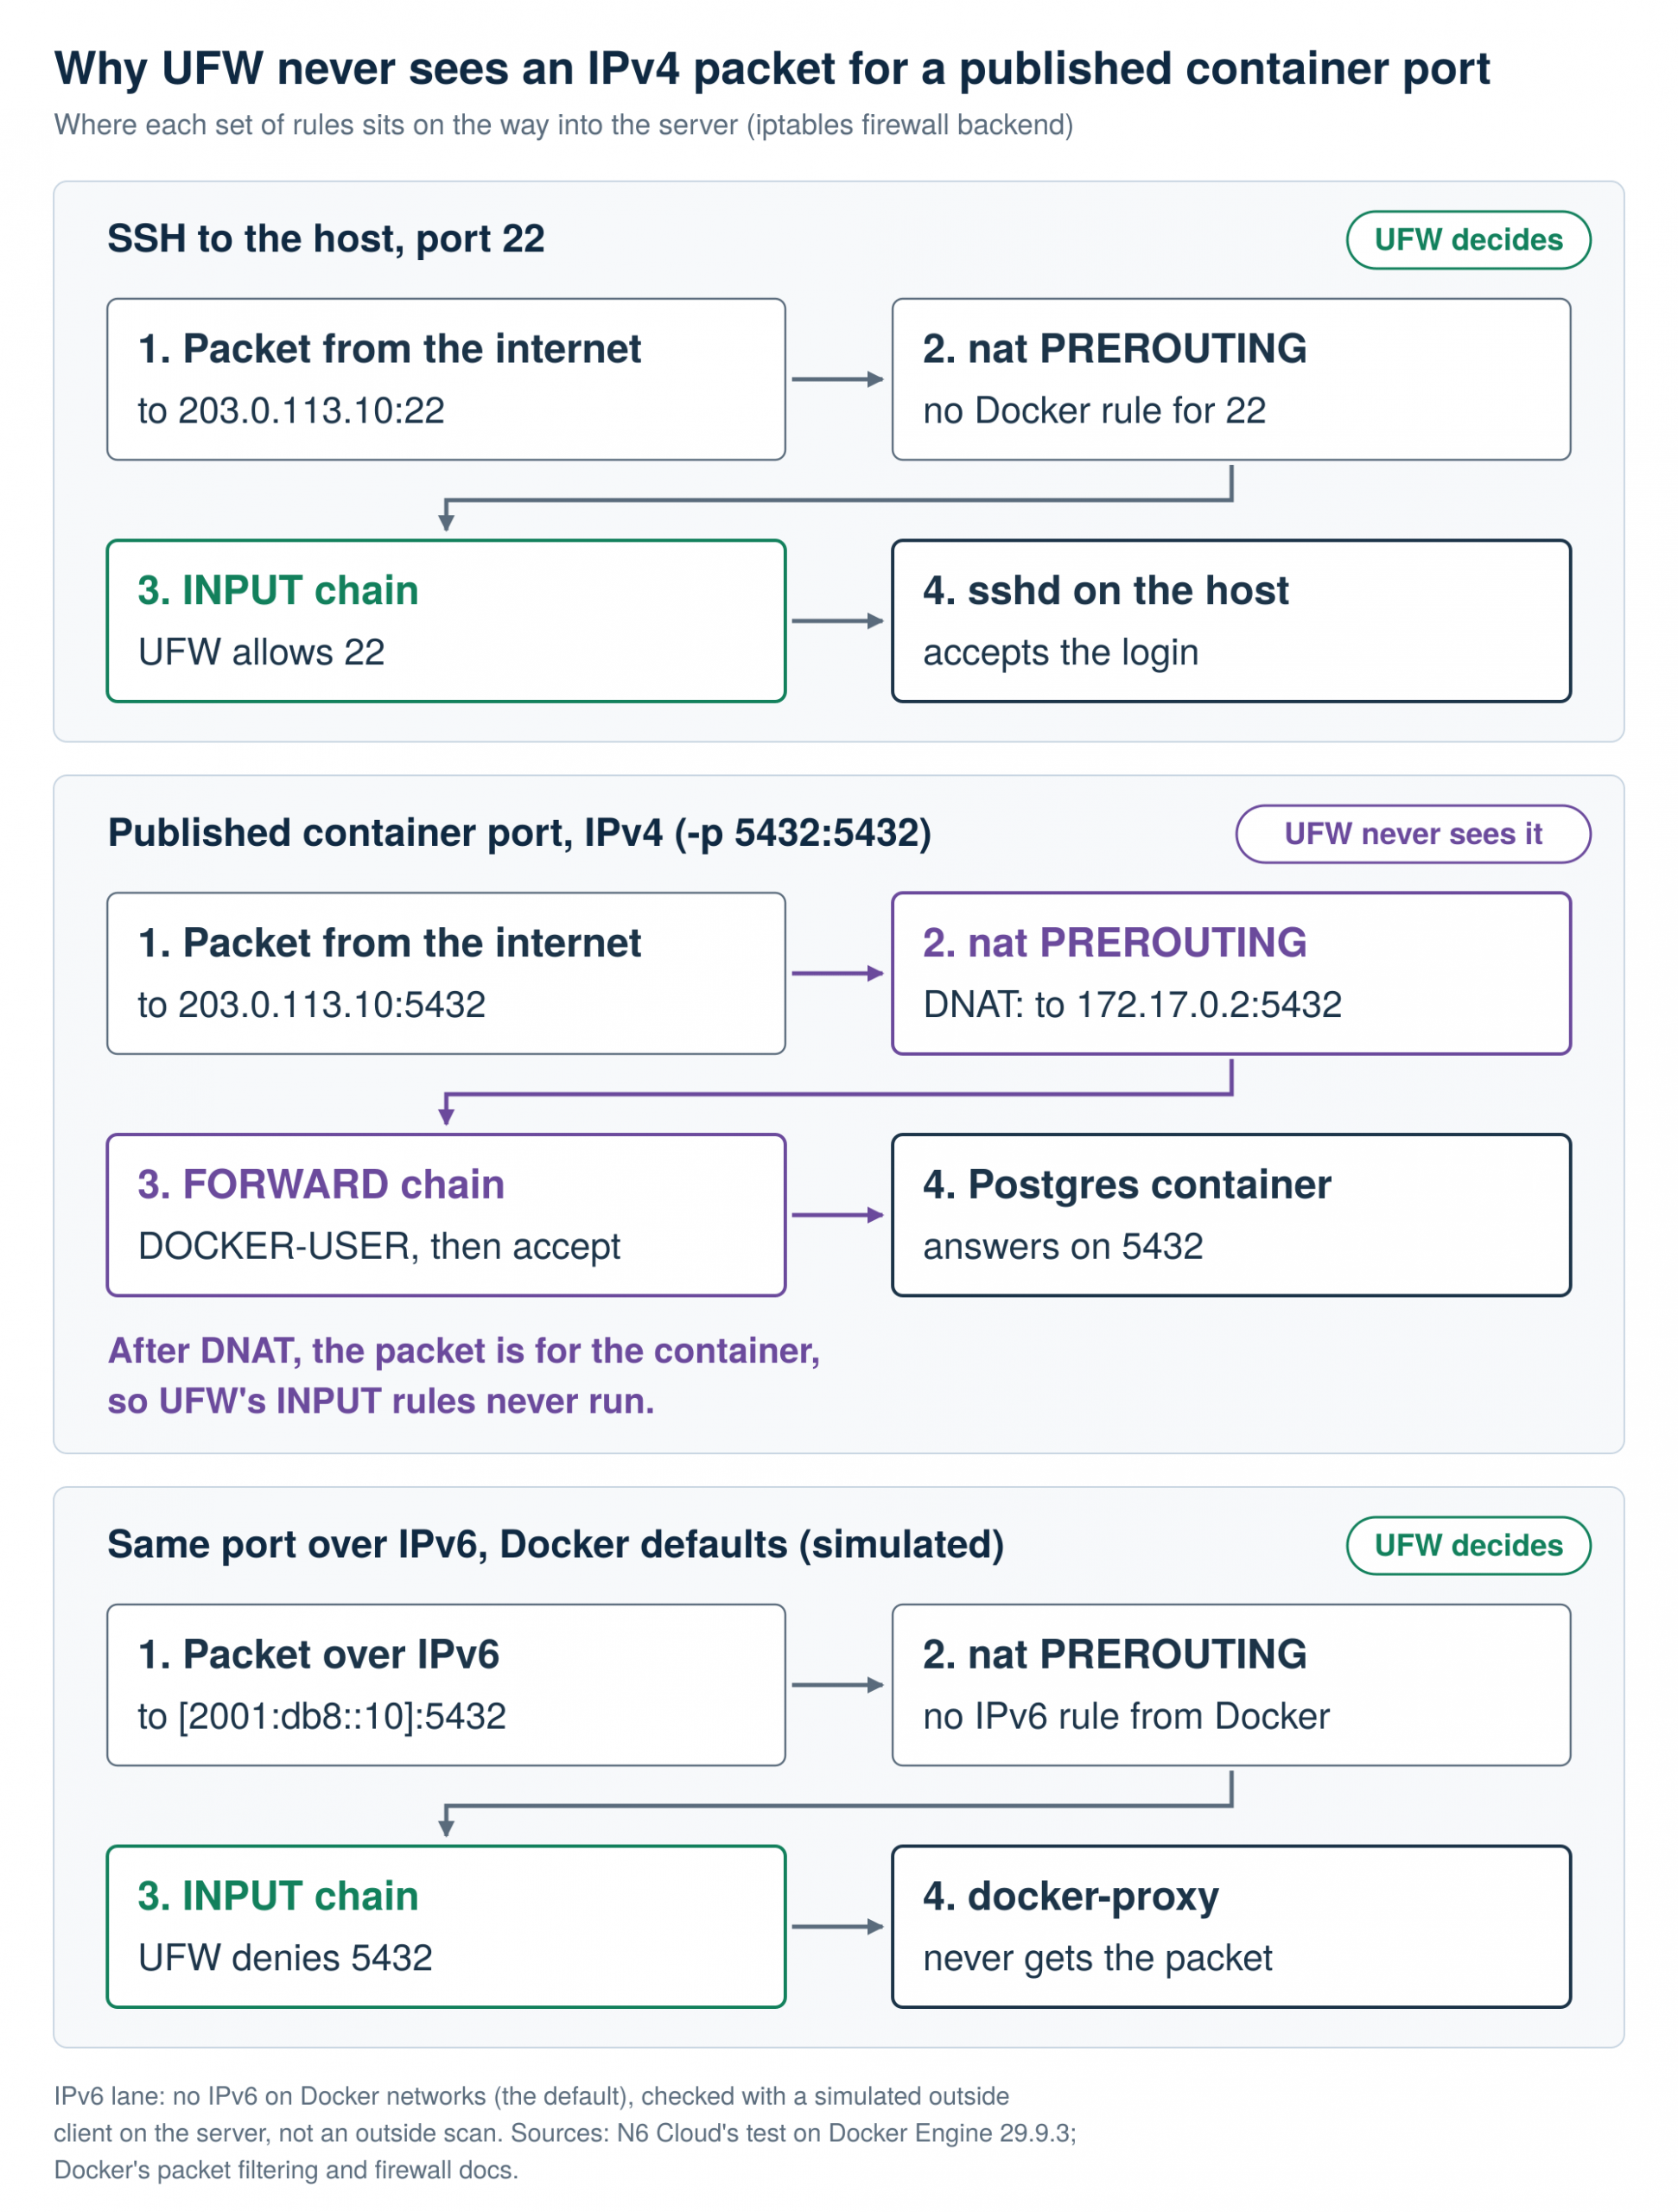
Why Docker bypasses UFW: SSH packets pass UFW's INPUT rules, while IPv4 packets for a published container port are rewritten by Docker and forwarded past UFW
Figure 2. Over IPv4, a published container port skips UFW's INPUT rules, while SSH on the host still goes through them.

The trigger is the laptop habit of -p 5432:5432, or "5432:5432" under ports:, which publishes the port on every address the server has. N6 Cloud’s test published Postgres with -p 5432:5432 and Nginx with -p 8080:80, then checked UFW:

				
					sudo ufw status verbose
#


UFW allowed only SSH, 80, and 443, yet a scan from a separate computer disagreed:

				
					nmap -Pn -sT -p 22,5432,8080 203.0.113.10


This TCP connect scan (-sT, with -Pn to skip the ping check) found 5432 and 8080 open in all three runs. Run it from your own computer with your server’s address, after installing nmap from nmap.org or your package manager. On a real server, the database password is all that would stand between your data and the automated scanners that look for open database ports. Scan only servers you own, since many providers’ terms forbid scanning other machines.

IPv6 behaved differently in a simulation on the server (the scanning computer had no IPv6 route). With Docker’s defaults, IPv6 connections went through docker-proxy and the INPUT chain, where UFW blocked them. Treat the bypass as an IPv4 problem, or as both if you turn on IPv6 for Docker networks, and see Docker’s packet filtering and firewall docs for the full rules.
Closing the gap Docker opens in UFW: barriers seal a red path that slipped through the firewall to a database port

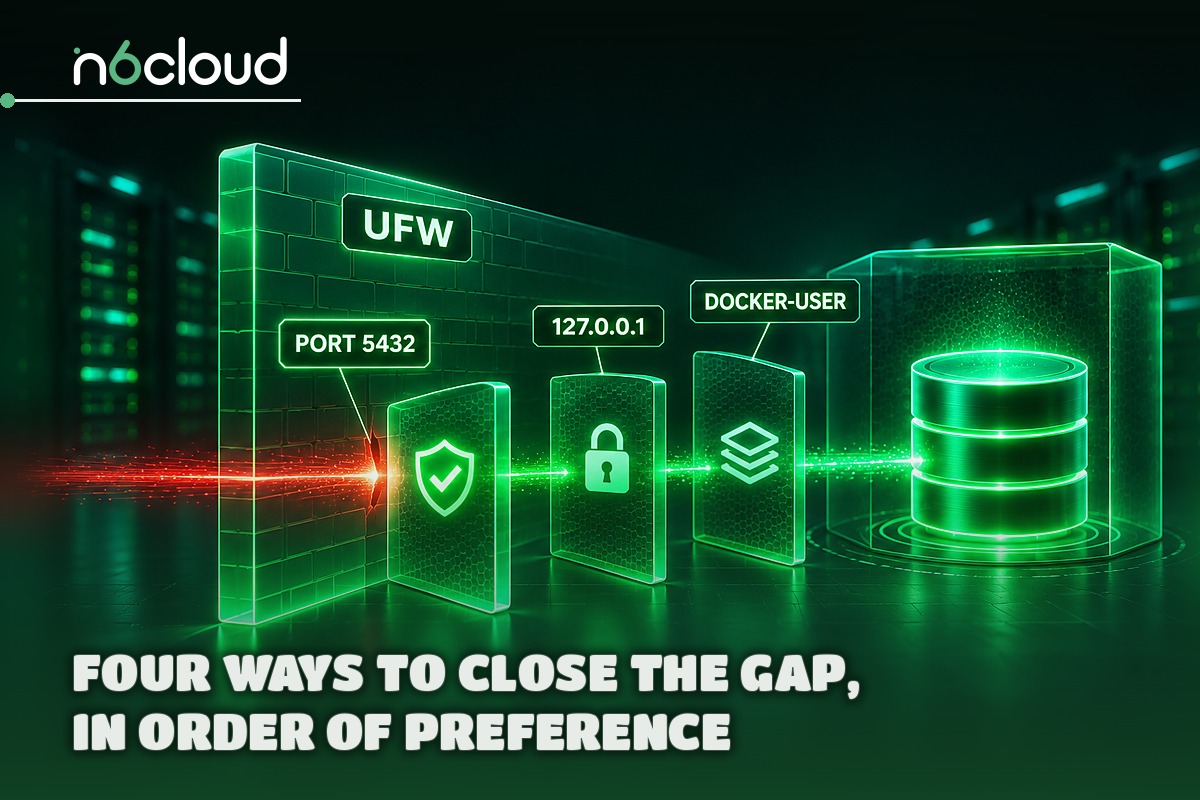
Four Ways to Close the Gap, in Order of Preference

If you used the Compose file above, you already have fix 1 and need nothing more. Its database has no ports: entry, and in the test that left 5432 filtered, meaning the scan got no answer. If your own scan showed a database port open, delete its ports: lines, run sudo docker compose up -d so Compose recreates the container, and scan again. Then change the password inside Postgres, because editing .env doesn’t change it once the database exists. Run sudo docker compose exec db psql -U appuser -d appdb and type \password appuser. Put the same new password in both .env lines, and run sudo docker compose up -d so the app picks it up. Postgres doesn’t log successful logins by default, but sudo docker compose logs db shows failed password attempts, which tell you scanners found the port. Fixes 2 to 4 cover cases fix 1 can’t.

Fix 2 is for a port you need on the server itself, such as a database you reach from your laptop through an SSH tunnel (ssh -L 5432:127.0.0.1:5432 [email protected]). Put the loopback addresses (the ones only the server itself can reach) in front of the port, as the test did with -p 127.0.0.1:5432:5432 -p "[::1]:5432:5432", and the scan then showed the port filtered. In Compose, the same two strings go under ports:, but Docker publishes nothing from a container whose only network is internal: true. Add the database to a second network of its own without that line, and check that sudo docker compose ps shows 127.0.0.1:5432 for db. This is private on current Docker, but before Engine 28.0.0, machines on the same network segment could reach it, so check yours with sudo docker version.

Fix 3 is an optional safety net that makes localhost the default, so a port you forget to bind stays private. It needs more care than the others, because it also makes Caddy’s ports private. The setting goes in Docker’s daemon configuration file:

				
					{
  "default-network-opts": {
    "bridge": {
      "com.docker.network.bridge.host_binding_ipv4": "127.0.0.1"
    }
  }
}


Save it as /etc/docker/daemon.json and run sudo systemctl restart docker. Docker’s default bridge network ignored the setting, though, so a docker run with no --network still published 8081 to every address. The setting also reaches only networks created after the restart. Compose creates its own networks, so a new stack is covered, but a running stack keeps its old networks until you take it down and start it again. In the test, both sites went offline until Caddy’s ports named every address. Before you recreate the stack, change Caddy’s ports: to these four lines:

				
					    ports:
      - "0.0.0.0:80:80"
      - "[::]:80:80"
      - "0.0.0.0:443:443"
      - "[::]:443:443"


Then run sudo docker compose down and sudo docker compose up -d in the project folder. The down command keeps your named volumes, so the database and certificates survive. Afterwards, sudo docker compose ps should show 0.0.0.0 and [::] for Caddy’s 80 and 443 again.

Fix 4 keeps a port public to some addresses only, such as your office’s, with rules in Docker’s DOCKER-USER chain, which run before Docker’s own. Each DROP rule needs a port match, or it blocks Caddy as well: in the test, a rule without one took both sites offline for everyone but the allowed address. A plain --dport 8080 doesn’t work either, because Docker has already rewritten 8080 to the container’s port 80 by the time the packet reaches DOCKER-USER. Matching the port the visitor asked for, with -m conntrack --ctorigdstport, works, one line per port. Put the rules in a small script and load it with a systemd service, so they come back whenever Docker starts:

				
					sudo tee /usr/local/sbin/docker-user-rules.sh >/dev/null <<'EOF'
#!/bin/sh
iptables -F DOCKER-USER
iptables -A DOCKER-USER -m conntrack --ctstate RELATED,ESTABLISHED -j ACCEPT
iptables -A DOCKER-USER -i eth0 -p tcp -m conntrack --ctorigdstport 5432 ! -s 198.51.100.7 -j DROP
iptables -A DOCKER-USER -i eth0 -p tcp -m conntrack --ctorigdstport 8080 ! -s 198.51.100.7 -j DROP
EOF
sudo chmod 755 /usr/local/sbin/docker-user-rules.sh
sudo tee /etc/systemd/system/docker-user-rules.service >/dev/null <<'EOF'
[Unit]
Description=DOCKER-USER firewall rules for published container ports
After=docker.service
Requires=docker.service
PartOf=docker.service

[Service]
Type=oneshot
RemainAfterExit=yes
ExecStart=/usr/local/sbin/docker-user-rules.sh

[Install]
WantedBy=docker.service
EOF
sudo systemctl daemon-reload
sudo systemctl enable --now docker-user-rules.service
sudo iptables -L DOCKER-USER -n -v --line-numbers


The script empties the chain, lets replies through, and then drops new connections to 5432 and 8080 that arrive on eth0 from anyone but 198.51.100.7. Use your real interface name from ip -br link, and check the result from a network other than the allowed one, such as a phone hotspot. With these rules, the sites kept answering on HTTPS while 5432 and 8080 were closed to everyone else, before and after a reboot. On each boot, though, the rules loaded about 1.2 seconds after the containers started, a short gap that fixes 1 and 2 don’t have. Don’t install iptables-persistent to save the rules instead, because on Ubuntu 26.04 it removes UFW. Docker’s nftables firewall backend, experimental since Engine 29.0.0, has no DOCKER-USER chain, so fix 4 needs the default iptables backend. Docker’s install page also warns that firewall rules written with nft directly aren’t supported, and the ufw-docker tool in forum answers is a third-party project, not Docker’s advice. Table 2 sums up the scans.

Setup 5432 over IPv4 8080 over IPv4 IPv6 (simulated client)
No fix: -p 5432:5432 and -p 8080:80
Open
Open
Blocked by UFW
Fix 1: database on its own network, not published
Filtered
Open (still published)
No IPv6 listener for 5432
Fix 2: bound to 127.0.0.1 and [::1]
Filtered
Filtered
Loopback listeners only
Fix 3: daemon default, user-defined network
No database in this run
Filtered
No IPv6 listener
Fix 3, default bridge network (port 8081)
No database in this run
Open (8081)
Blocked by UFW
Fix 4, early rule without a port match, scanner’s own address allowed
No database in this run
Open
Blocked by UFW
Fix 4: per-port rules above, scanner not allowed
Filtered
Filtered
Blocked by UFW

Docker Log Rotation and Disk Cleanup Before Your Disk Fills Up

Docker keeps every line a container prints until the container is deleted, so set log rotation on your first day. On the test server, with the default json-file driver, a container printing one short line in a tight loop wrote about 3 GB of logs in 2 minutes. It’s a worst case, but a chatty app does the same over weeks. Switch to the local driver, which Docker recommends, and restart Docker, which briefly stops your containers until their restart policy brings them back. The first line below replaces the whole daemon.json file, so if you set up fix 3, skip this block and use the combined file after it:

				
					echo '{ "log-driver": "local" }' | sudo tee /etc/docker/daemon.json
sudo systemctl restart docker


With fix 3, use this file instead, then restart Docker with sudo systemctl restart docker. It holds both settings and passed Docker’s own validation in the test:

				
					{
  "log-driver": "local",
  "default-network-opts": {
    "bridge": {
      "com.docker.network.bridge.host_binding_ipv4": "127.0.0.1"
    }
  }
}


The local driver keeps up to five 20 MB files per container and compresses the older ones, and the same loop stayed at about 23 MB on disk. Existing containers keep their old driver until you recreate them, which this check shows:

				
					sudo docker inspect --format '{{.HostConfig.LogConfig}}' myapp-app-1
sudo docker compose up -d --force-recreate app
sudo docker inspect --format '{{.HostConfig.LogConfig}}' myapp-app-1


Recreate every service the same way, once, with sudo docker compose up -d --force-recreate. For cleanup, check what’s using space with sudo docker system df. Then sudo docker system prune removes stopped containers, unused networks, dangling images, and build cache, but not volumes.

Volume pruning is where data gets lost. docker volume prune removes only anonymous volumes, but docker volume prune -a removes every volume no container is using. In the test, it deleted the database and files of a WordPress stack that had been taken down with docker compose down, 267.5 MB in all. The down command removes a stack’s containers, which leaves its volumes unused, so check sudo docker volume ls before you run it.
A tested Docker backup: a database dumped to a backup, restored into a fresh database, and an update rolled back

Backups You’ve Actually Restored, Plus Safe Updates and Rollbacks

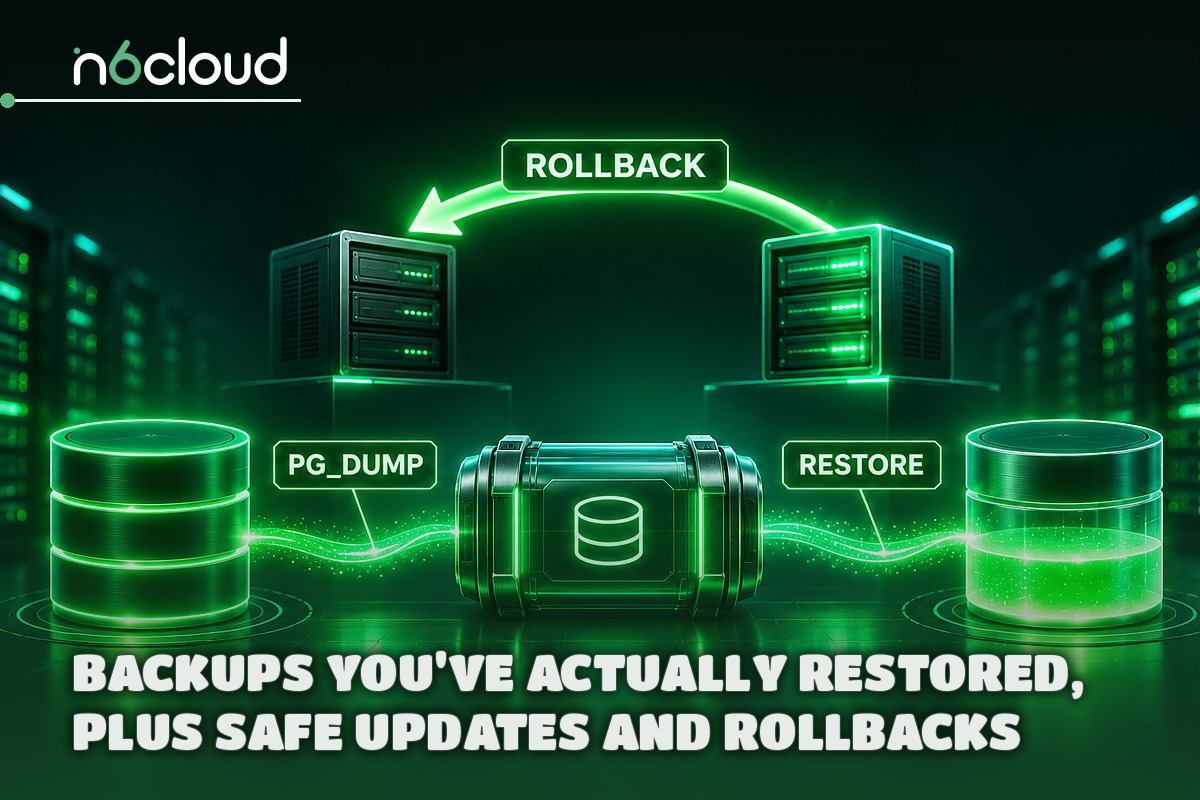
A backup counts only once you’ve restored it, so test the restore before you need it. For a database, use its own dump tool rather than copying the volume while it runs. With Postgres in Compose, that’s one command. Create a private folder for backups first with mkdir -p -m 700 /home/deploy/backup, and then run:

				
					sudo docker compose exec -T db pg_dump -U appuser -d appdb -Fc > /home/deploy/backup/appdb.dump


-T stops Compose from attaching a terminal, so the dump reaches the file unchanged. -Fc writes the compressed format that pg_restore reads. The next block is a drill that deletes the database, so run it only on a test server or a copy of your project, never on a live one:

				
					sudo docker compose down
sudo docker volume rm myapp_db_data
sudo docker compose up -d
sudo docker compose exec -T db pg_restore -U appuser -d appdb --clean --if-exists < /home/deploy/backup/appdb.dump
sudo docker compose exec -T db psql -U appuser -d appdb -t -c 'SELECT count(*) FROM notes;'


Before the restore, the count failed because the table was gone, and after it, the count was 100000, matching the original. The restore took 0.36 seconds, and the site served again straight after. After a real failure, you’d start from the empty database and run only the last two lines, with your own table in the count.

Volumes that hold files, such as Caddy’s certificates, are archived with a temporary container. The test packed myapp_caddy_data into one file and unpacked it into a new volume to compare the two:

				
					sudo docker run --rm -v myapp_caddy_data:/data -v /home/deploy/backup:/backup alpine:3.24.4 tar czf /backup/caddy_data.tgz -C /data .
sudo docker volume create caddy_data_restored
sudo docker run --rm -v caddy_data_restored:/data -v /home/deploy/backup:/backup alpine:3.24.4 tar xzf /backup/caddy_data.tgz -C /data


All 10 restored files matched the originals’ checksums. Copy both backups off the server, because a backup on the same VPS is lost with it. Use your provider’s server backup as a second layer if it has one.

Pinned tags also make updates reversible, because the old image stays on the server under its own name. To release new code, pull it into the project folder, change the app’s tag, build, and start:

				
					sed -i 's/image: myapp:v1/image: myapp:v2/' compose.yaml
sudo docker compose build app
sudo docker compose up -d app


Build before up -d here too. In the test, an up -d without the build step first tried to pull myapp:v2 from Docker Hub, which would run someone else’s image if one existed under that name. Only the app container was replaced, and a loop sending one request per second through Caddy saw no errors. To roll back, run the same sed with v2 and v1 swapped, then sudo docker compose up -d without building. The loop’s 77 requests covered both switches, and the rollback caused the only failure, a single 502, so a single-container switch isn’t zero-downtime. Avoid pull_policy: build and up --build here, since both would rebuild v1 from your new code, and keep the old image until the new version has run for a few days.

A VPS cabinet with full root access on KVM and NVMe storage, in Canadian facilities, ready to run Docker

Why Trust N6 Cloud for Running Docker on a VPS?

N6 Cloud builds its VPS for this: every VPS comes with full root access on KVM virtualization and NVMe storage, which helps when you pull images and when your database writes to disk. N6 Cloud is based in British Columbia (BC) and hosts every VPS in Canadian facilities, so your server and the data on it stay in Canada. Docker isn’t recommended beside the control panel on N6 Cloud’s managed VPS, so pick the unmanaged one. For the server-level copy the backup section suggests, N6 Cloud offers an optional Cloud Backup add-on, which isn’t enabled by default.

When your stack outgrows its server, you can add CPU, RAM, or NVMe storage from the N6 Cloud portal, with your data, configurations, and applications intact, but not downgrade, so start small. Scaling up keeps everything in this guide working, with no change to the Compose file, firewall, or backups. A short job such as a load test suits cloud servers you add by the hour, which you delete when it’s done. Kubernetes pays off only once you run several servers and have a team to look after them, so for most small projects, Docker Compose on one server is enough.

If you’re ready to put your own Compose app online, start with one of N6 Cloud’s NVMe VPS servers in Canada and choose Ubuntu 26.04 LTS on the deploy form. Support is 24/7 by ticket and phone, with live chat from 9:00 AM to 5:00 PM Pacific, and every VPS has a 30-day money-back guarantee. If a step doesn’t go as shown, open a ticket with the commands you ran and their output.


Frequently Asked Questions

Can I run Docker on any VPS?

No. Docker needs a VPS with its own Linux kernel and root access, such as a KVM VPS, so shared hosting won’t work. Run systemd-detect-virt first: kvm means you’re ready. If it prints lxc or openvz, ask your provider whether Docker is supported before you install anything.

How much does it cost to run Docker on a VPS?

You pay only for the server. Docker Engine and the Compose plugin are free, open-source software, and Docker Engine is licensed under Apache 2.0, so there’s nothing extra to buy for a VPS. Docker Desktop’s subscription terms cover Docker Desktop, the app for laptops and desktops, which you don’t install on a server.

How long does it take to set up Docker on a new VPS?

The commands take under 10 minutes of machine time on a fresh VPS. In N6 Cloud’s test, the package updates took 1 minute 43 seconds, and pulling seven images took 1 minute 30 seconds. Reading, typing, and checking each step take most of the real time, so allow an hour or two, plus however long new DNS records take to resolve.

Related Posts