

How to set up a cloud server: commands flow from a blank terminal through a virtual machine and firewall to a live website

How to Set Up a Cloud Server, From Blank Screen to Live Website

Table of Contents

Setting up your first cloud server can feel like a test you might fail in public. Most people worry about two things: breaking something they can’t undo, and leaving a door open for someone else. This guide shows how to set up a cloud server in an order that guards against both, so you end with your own domain on HTTPS, behind a firewall, without locking yourself out.

You need an account with a cloud provider, a domain name, a small monthly budget, and a terminal on Windows, macOS, or Linux. Plan on about an hour of careful work, plus some waiting for DNS. The screenshots come from N6 Cloud’s control panel, and N6 Cloud ran each command below on a new Ubuntu 26.04 cloud server, so the output you see is real.

Before You Set Up a Cloud Server: Three Decisions That Shape Everything

The first decision is whether a cloud server is the right place to start. It is if you want full control and you’re willing to learn how a server works. It isn’t if you only need a website online and would rather not look after a server yourself. Table 1 compares the usual starting points.

Shared hosting VPS Cloud server
Who manages the server
The host; you look after your site only
You, or the host on a managed plan
You
How you pay
A fixed monthly or yearly plan
By the hour, for what you use
Best first use
A blog or brochure site with no server work
A steady project that needs root access at a set price
Learning, testing, and projects that grow or pause

If a predictable bill matters more than an hourly meter, VPS hosting at a fixed monthly price gives you the same root access. Every command from Step 1 onward works the same way on an unmanaged Ubuntu VPS, and for these steps only the panel screens and the billing differ. The two also differ under the hood, in where the disk lives and how the server changes size, but none of that changes a command below.

Picking a Location, Size, and OS Image

Pick the data centre closest to your visitors, the smallest size that fits, and an Ubuntu LTS image. Every request travels from the visitor to the server and back, so distance adds delay to every click. A site for customers in BC or Alberta belongs in Vancouver or another western region, not Europe, because moving it later means rebuilding the server.

For a static site, 1 vCPU (one virtual processor core) and 1 GB of memory is enough; for a small WordPress site, start with 2 GB. In N6 Cloud’s test, a new Ubuntu 26.04 server running Nginx used about 370 MB of memory, and the whole setup used 2.7 GB of disk. These figures are for one small site, and a business app with many users needs more. Because a cloud server can change size, starting small is low risk: you add memory when traffic grows instead of paying for it from the first day.

For the operating system, choose Ubuntu 26.04 LTS (long-term support). It came out on 23 April 2026 and gets standard security updates until 2031, and Ubuntu Pro, free for personal use on up to five machines, stretches that to 10 years. Avoid 22.04, whose standard support ends in May 2027. Ubuntu is also what most forum answers assume, which helps when you search for an error.

Password or SSH Key? Decide Now, Not Later

Use an SSH key from the first minute. An SSH key is a pair of files: the private key stays on your computer and proves who you are, and the public key sits on the server and checks that proof. Bots try passwords on public servers all day, and a key can’t be guessed the same way. Adding it at creation is easier than switching later.

For a first server, let the panel make the key. In the N6 Cloud panel, open the SSH Keys page, choose Generate Key, and give the key a name. The panel then shows the private key on its own page, once (Figure 1). Copy everything from the BEGIN line to the END line before you click away, or you’ll have to generate a new pair.
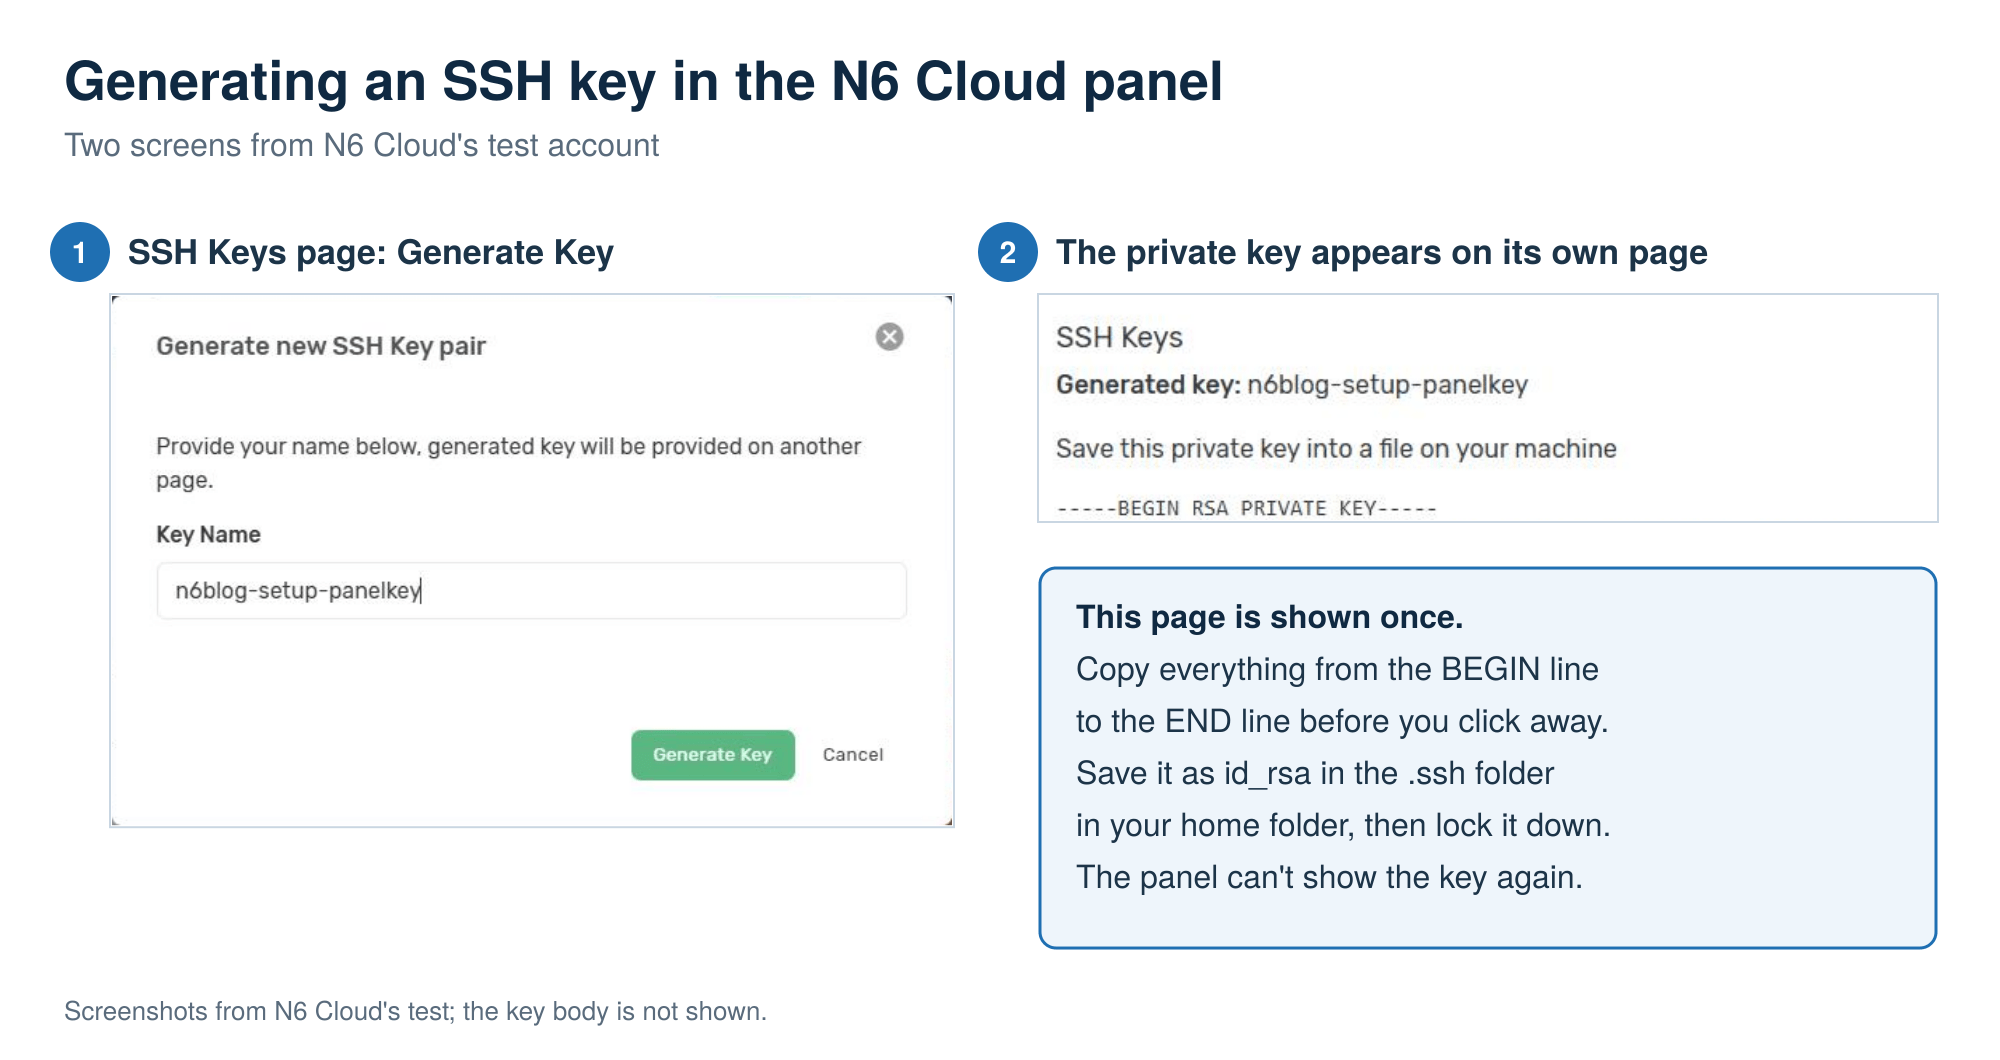
N6 Cloud panel screens for creating a cloud server SSH key: the Generate Key dialog and the one-time page that shows the RSA private key
Figure 1. The panel shows a generated private key once, so save it before you leave the page.

Save the text as a file called id_rsa in a folder called .ssh inside your home folder, so ssh finds it without extra options, as it did in N6 Cloud’s test. If the folder doesn’t exist, create it in PowerShell or Terminal:

				
					mkdir ~/.ssh


This creates the .ssh folder (on Windows, C:\Users\yourname\.ssh); if it says the folder already exists, carry on.

In Windows Notepad, paste the key, choose File, Save as, set “Save as type” to “All files”, and type id_rsa as the name, so Windows doesn’t add .txt. If you already have a file called id_rsa, don’t overwrite it: save the new key as n6-key, connect with ssh -i ~/.ssh/n6-key [email protected], and add -i ~/.ssh/n6-key to the later ssh, scp, and sftp commands. A key kept in your own user folder is private to your account. If ssh ever warns “UNPROTECTED PRIVATE KEY FILE” or about bad permissions, other accounts can read the file. Create a new file in your own .ssh folder, paste the key into it, and delete the old one, because a moved file keeps its old permissions. On macOS and Linux, lock the file down:

				
					chmod 600 ~/.ssh/id_rsa


This makes the file readable by you alone, which SSH requires; use ~/.ssh/n6-key instead if you saved it under that name.

The panel’s key is a 2048-bit RSA key, which current SSH versions accept. If you already use your own ed25519 key, the type Ubuntu’s OpenSSH server guide recommends, paste its .pub line into the panel with Register Key instead and skip the steps above.

Most Windows 10 and 11 computers already include the OpenSSH Client, which provides ssh, scp, and sftp, so there’s usually nothing to install. If PowerShell says ssh isn’t recognized, add OpenSSH Client under Settings, Optional features. You don’t need PuTTY.

A Create Server control on a panel screen beside a login terminal, the first step in setting up a cloud server

Step 1: Create Your Server and Log In for the First Time

Three tasks turn an empty account into a server you can trust. First you create it, then you log in once and confirm who you’re talking to. Last, you bring its software up to date.

Deploying the Server in the Control Panel

On N6 Cloud, the create form asks for a hostname, the OS template (Ubuntu Server 26.04), a size in vCPU and memory, your SSH key, the number of public IPs, and a disk size. The panel copies your chosen public key onto the server at creation, so one you add to your account later won’t appear here. During N6 Cloud’s test, a cloud server deployed from the panel showed as ON about a minute after the Create click.

The Public IP setting decides how the internet reaches your server, and there are two ways to set it up. Set it to 1, and the server gets an additional public IP with static NAT (network address translation), which passes every port straight to the server. This is what the test used, and that IP is billed by the hour. Set it to 0 instead, and you use the cloud’s free router IP. It needs a port forward plus an inbound firewall rule for each of TCP 22 (SSH), 80 (HTTP), and 443 (HTTPS). Each forwarded port goes to one server, which suits a single site. For one small site, either works. This guide follows the additional IP because opening a port then takes one firewall rule instead of a forward plus a rule. The router IP is the choice if you want the lowest bill. Figure 2 shows both, and the section on what a stopped server costs compares their charges.
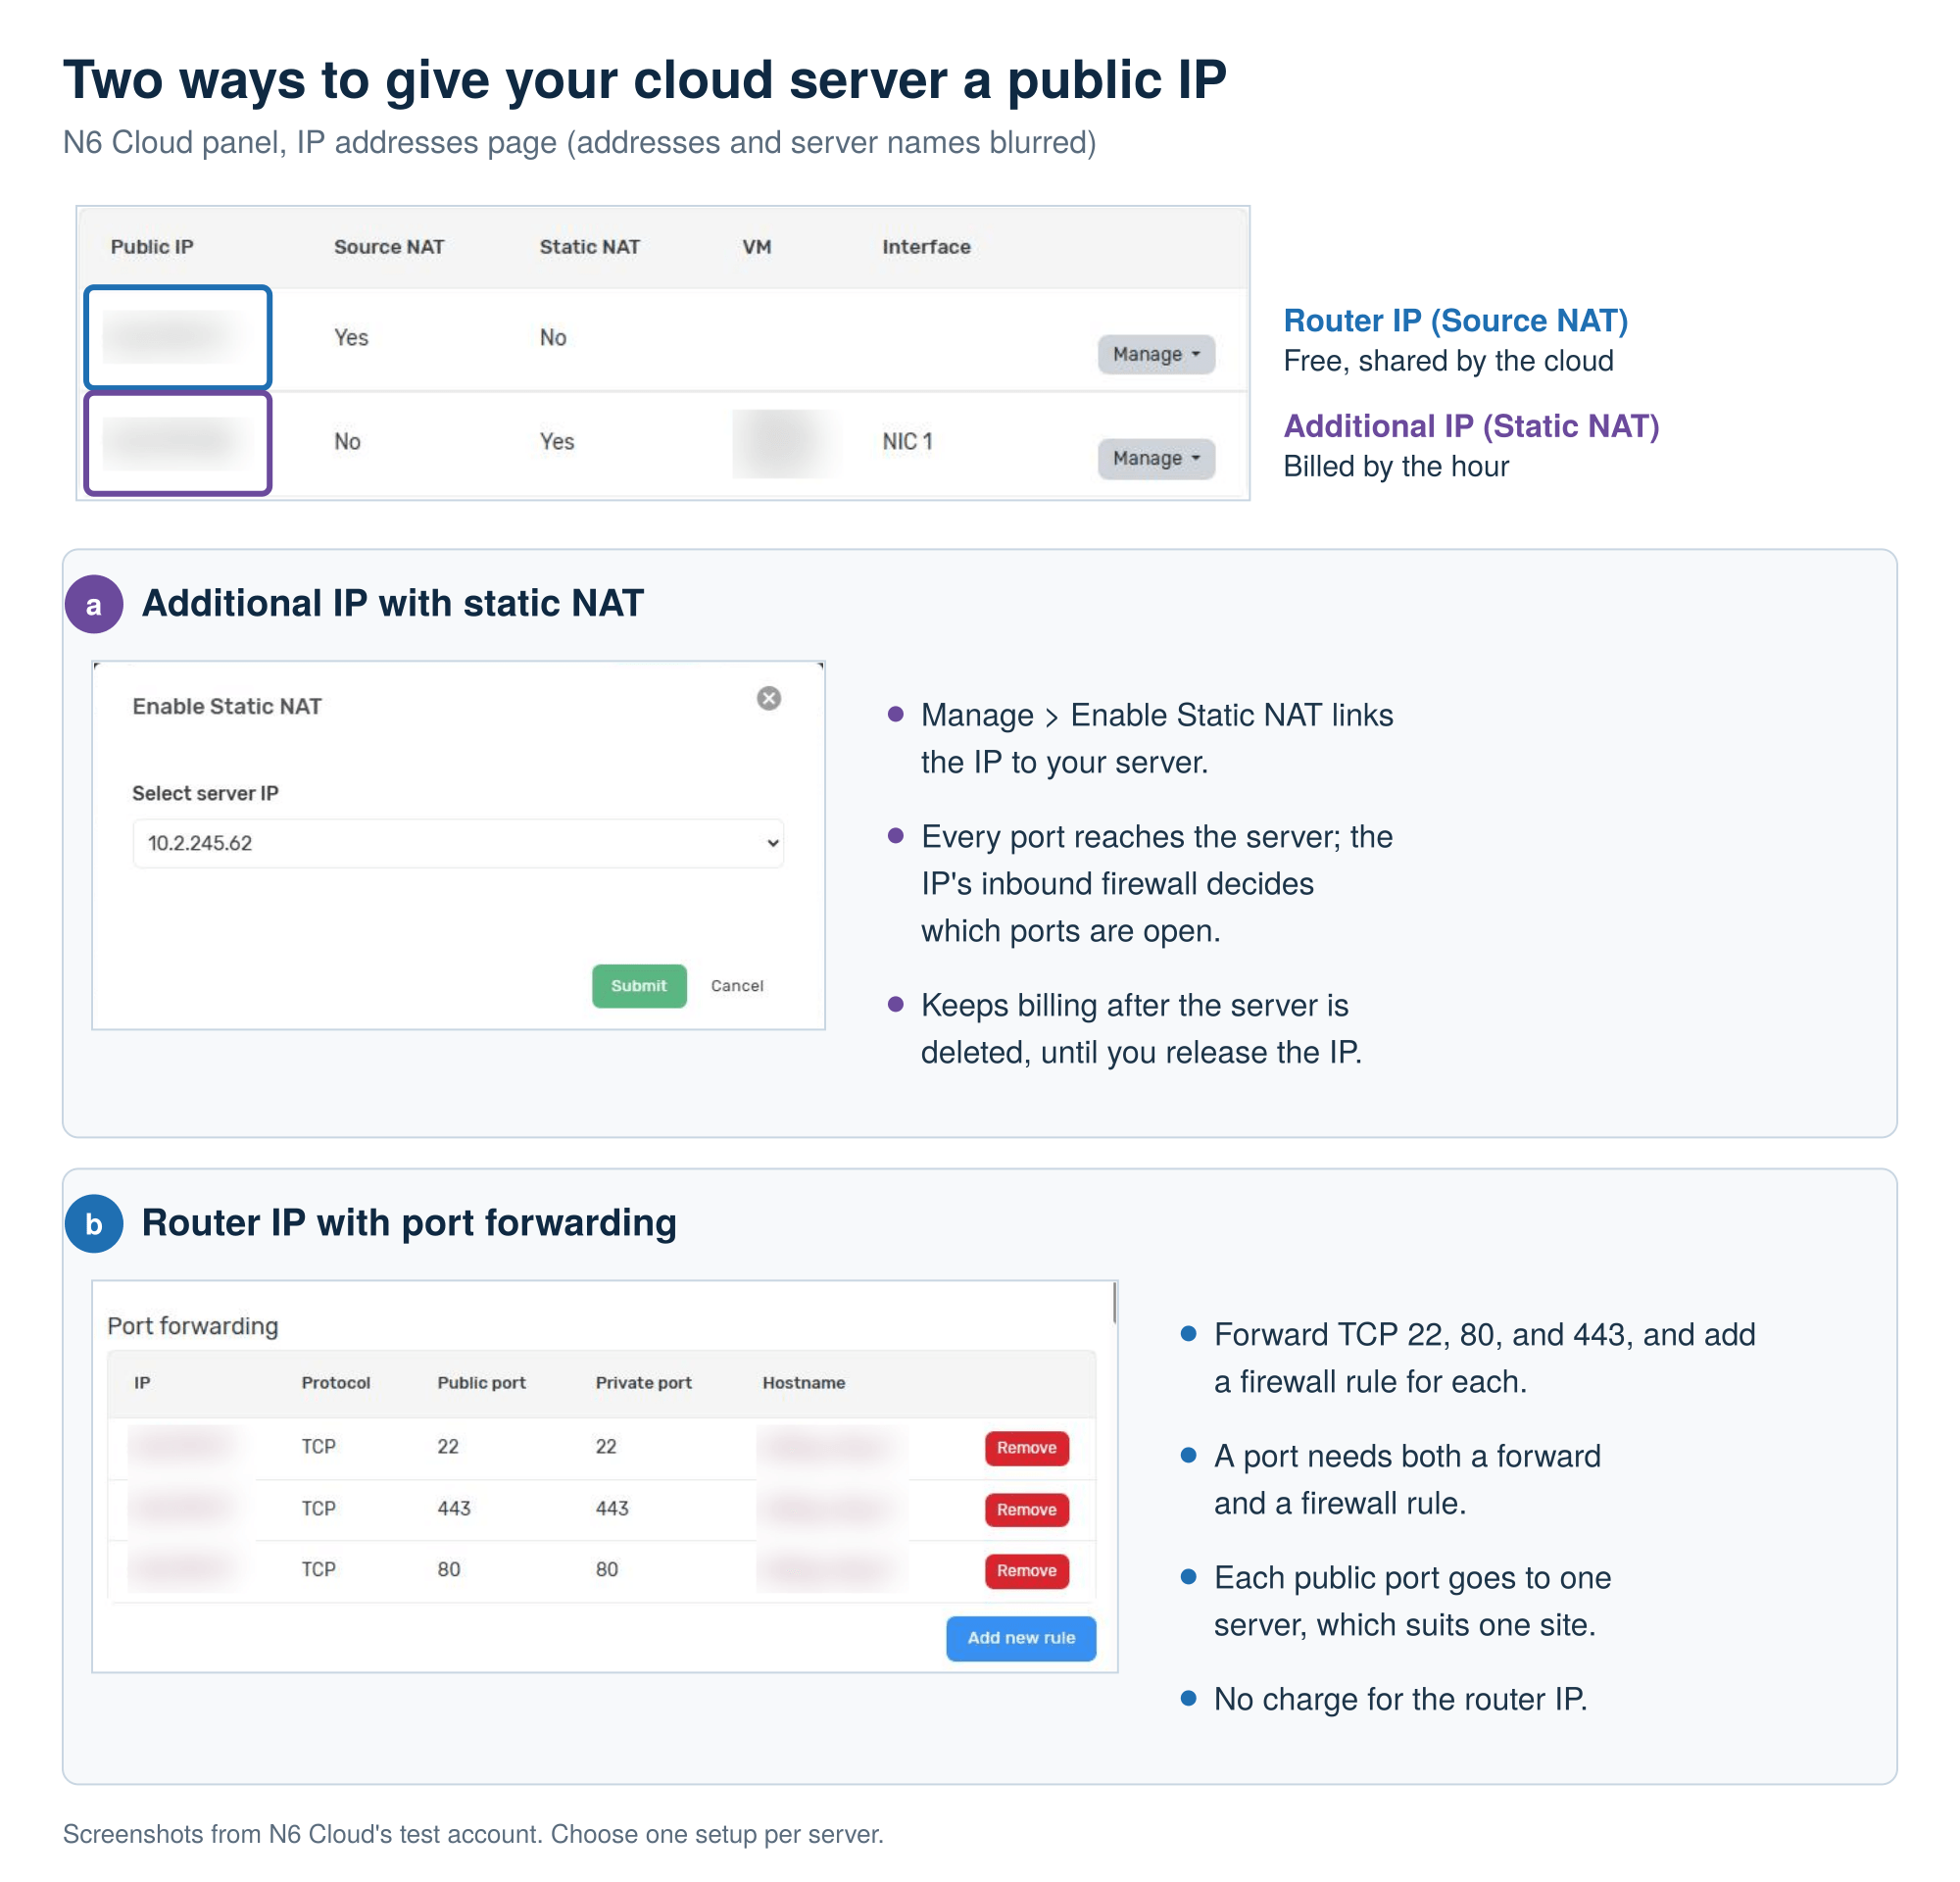
Two ways to give a cloud server a public IP in the N6 Cloud panel: an additional IP with static NAT, or port forwarding on the free router IP
Figure 2. An additional IP sends every port to one server; the free router IP sends only the ports you forward.

The panel’s firewall keeps its rules per public IP, and a new IP has no rule for port 22, so SSH stays closed until you add one. Add an ingress (inbound) rule for TCP 22 with your own address as the source, written as your IP followed by /32. That’s your internet connection’s public address, not your laptop’s: search “what is my IP” or open api.ipify.org to see it. Use the address made of four numbers separated by dots (IPv4), which api.ipify.org always shows. Some home and café connections change address, and the login then times out, so update the rule from wherever you are. On the router IP, add the same port 22 rule next to its forward, because a forward alone doesn’t open the port.

Your First SSH Login (and That Scary Fingerprint Prompt)

The authenticity message on your first login is the server introducing itself, not a sign that anything is wrong. Connect as root, using your server’s IP in place of the example address used throughout this guide:

				
					ssh root@203.0.113.10


This logs in as root with the key in your .ssh folder.

SSH then says it can’t establish the authenticity of the host, shows an ED25519 fingerprint, and asks whether to continue. The fingerprint summarizes the server’s own host key, its ID card. Type yes, and SSH remembers it in a file called known_hosts. It prints “Permanently added ‘203.0.113.10’ (ED25519) to the list of known hosts”, and later logins check against that entry with no prompt. If you later see “REMOTE HOST IDENTIFICATION HAS CHANGED”, expect it only after you rebuild the server or move its IP to a new one. At any other time, find out why before you delete the old line.

Update Everything Before You Do Anything Else

Install the waiting security updates first, because a new server starts from an image that may be weeks old. Run this as root:

				
					apt update && apt upgrade -y


This refreshes the package list and installs every update. On the test server, 48 updates, including a new kernel, took 5 minutes and 21 seconds on 1 vCPU, so let it finish.

				
					ls /var/run/reboot-required


This checks whether an update needs a restart; “No such file or directory” means it doesn’t.

				
					reboot


This restarts the server and closes your session; the test server took about 47 seconds to accept logins again.

Automatic security updates are already on in Ubuntu through a tool called unattended-upgrades. The tested image had both settings in /etc/apt/apt.conf.d/20auto-upgrades set to “1”, meaning the package list refreshes and security updates install every day. Some guides tell you to install that tool, but there’s nothing to enable.
A cloud server rack inside a shield marked secured, as the setup locks down logins and the firewall

Step 2: Lock It Down, Including the Traps Most Guides Miss

The server is current but wide open: root logs in directly, passwords may work, and no firewall runs. On Ubuntu 26.04, the initial server setup has three parts: a sudo user, key-only logins, and a firewall. Do them in that order, because each depends on the one before.

Take a disk-only snapshot from the server’s page in the panel now, and again before the firewall and before the certificate. A snapshot is a saved copy of the disk you can roll back to if a step goes wrong. Keep your first SSH window open for the whole section and test each change in a second one; if both close, the console is your way back in, as the UFW section explains. Security is now your job, which is part of what it costs to manage a server yourself.

Create a Sudo User and Stop Living as Root

Do daily work as a normal user who borrows admin rights with sudo. Root can change anything without asking, so as root a typo or a stolen session has no safety net. Replace yourname with the name you want:

				
					adduser yourname


This creates the user and asks for a password; choose a strong one, because sudo and the browser console both ask for it.

				
					usermod -aG sudo yourname


This adds the user to the sudo group; the -a keeps its other groups.

				
					rsync --archive --chown=yourname:yourname ~/.ssh /home/yourname


This copies root’s .ssh folder, with your public key in authorized_keys, to the new user. It works from any computer, so you don’t need ssh-copy-id, which Windows doesn’t include. Now open a second window, keep the first open, and log in as the new user:

				
					ssh yourname@203.0.113.10


You should get in with no password prompt.

				
					sudo whoami


After your password, this prints root, as it did on the test server, so the user can act as root when it needs to. From here on, every command runs as this user.

Turn Off Password Logins and Check What SSH Is Using

SSH settings live in /etc/ssh/sshd_config and in small files in /etc/ssh/sshd_config.d/, which the main file reads at its Include line. For each setting, SSH keeps the first value it finds. The read order is the lines above Include, then the small files in alphabetical order, then the rest of the main file, so a setting read early can overrule the line you edit. Figure 3 shows how this played out on the tested image.
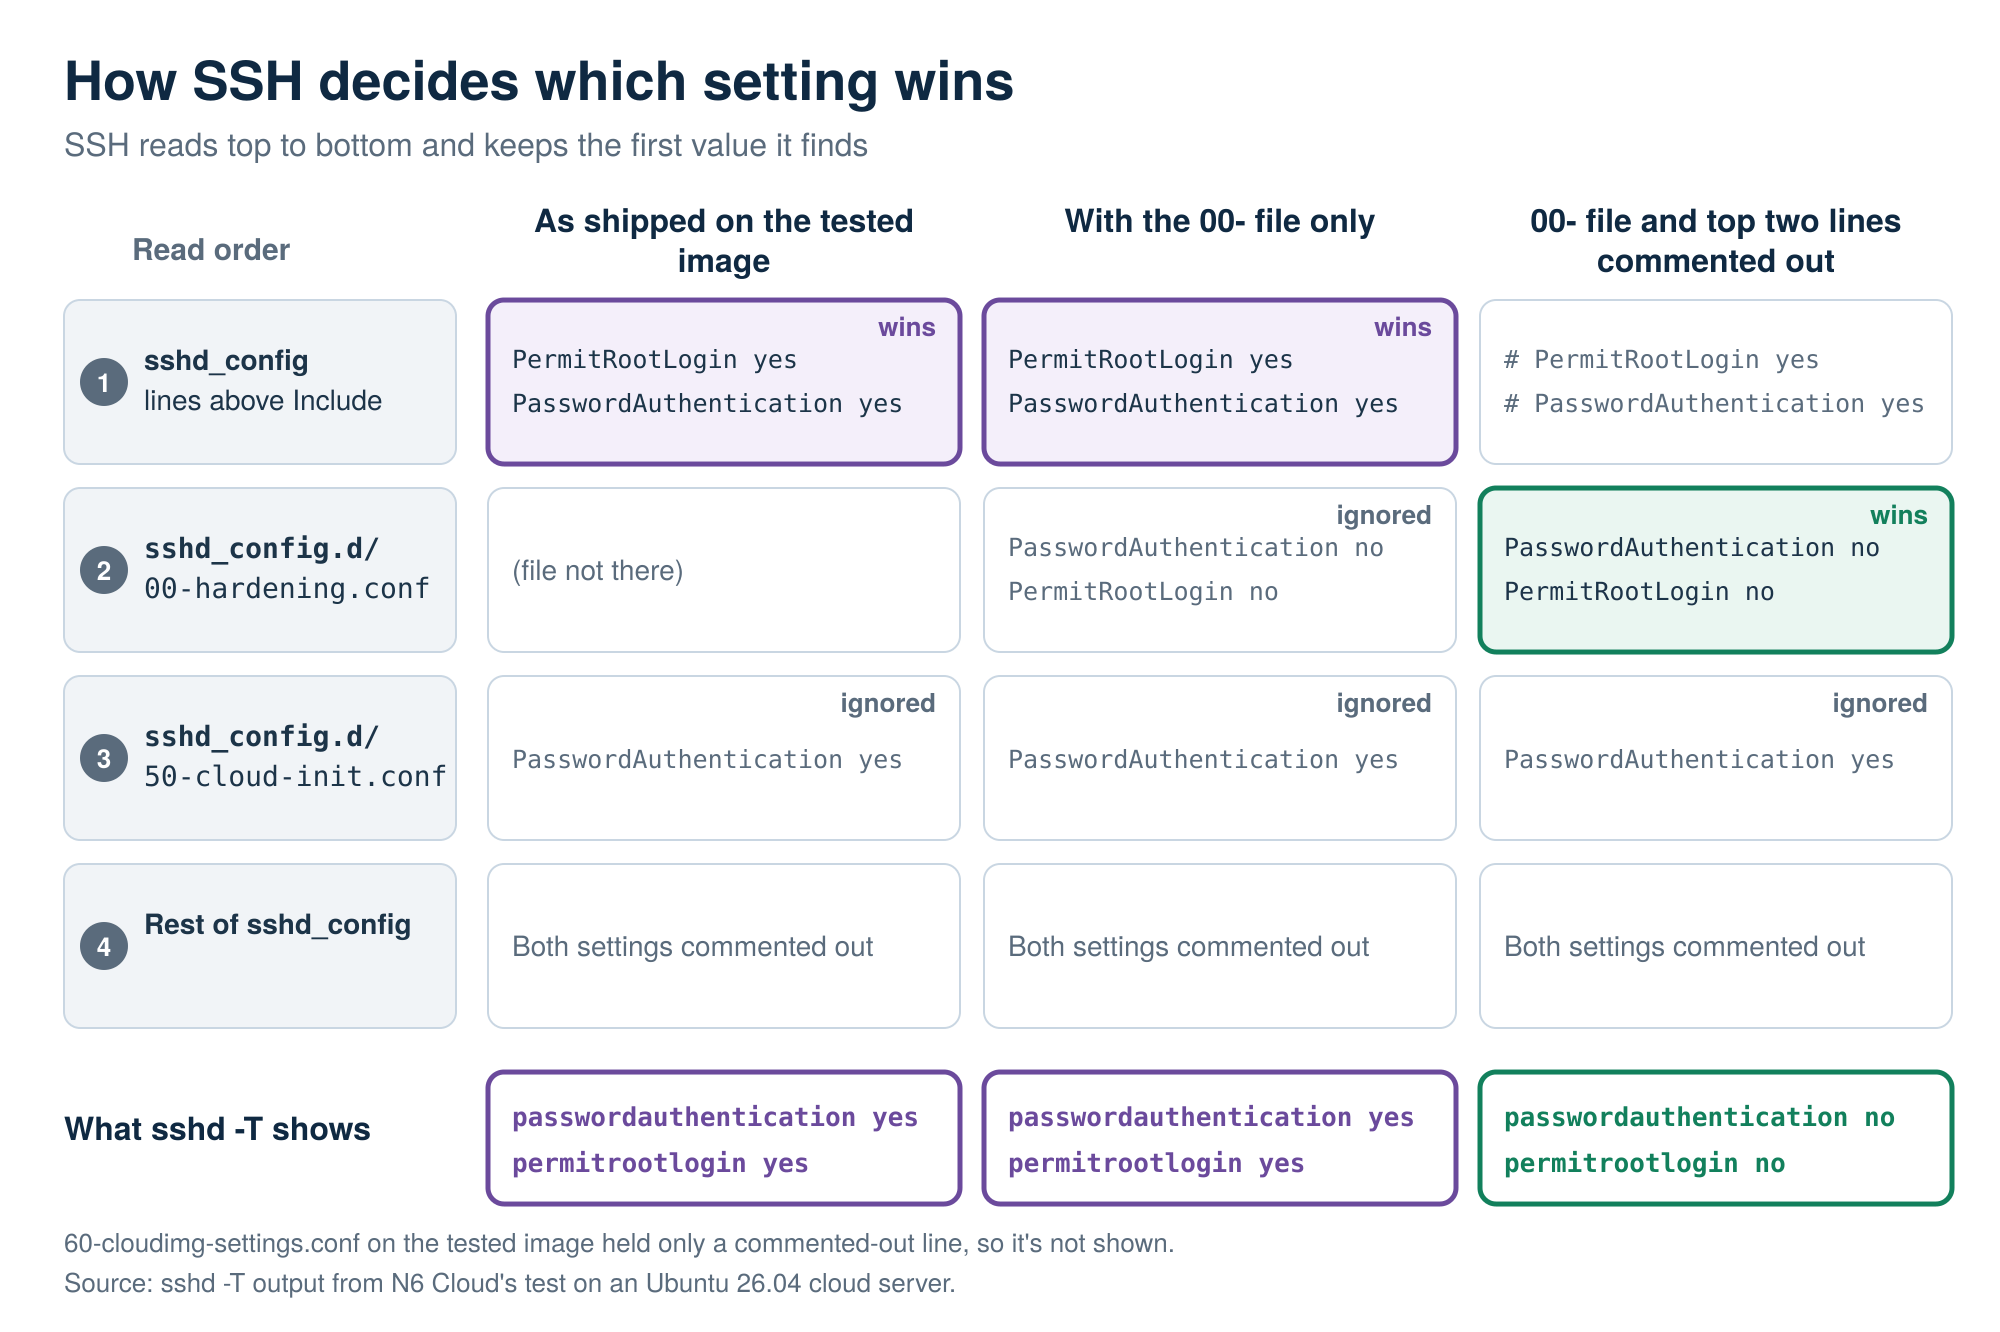
How SSH picks a setting on Ubuntu 26.04: lines above Include, then sshd_config.d files in order, with the first value winning in three scenarios
Figure 3. SSH keeps the first value it reads, so on the tested image only commenting out the top two lines lets the 00- file win.

On the image in N6 Cloud’s test, the first two lines of sshd_config turned on root and password logins above the Include line, and 50-cloud-init.conf also said PasswordAuthentication yes. Cloud-init writes that file from the provider’s password setting, so its content differs between images. The image also sets a root password you never see, so while password logins stay on, a bot that guessed it could log in. Check what SSH is really using:

				
					sudo sshd -T | grep -Ei 'passwordauthentication|kbdinteractiveauthentication|permitrootlogin'


This prints the settings SSH will use after reading every file. The test server printed:

				
					permitrootlogin yes
passwordauthentication yes
kbdinteractiveauthentication no


If all three say no, you can skip the file edits, but still run the password-only login test at the end of this section. If not, check your main file for lines above Include:

				
					sudo grep -n -E '^(PermitRootLogin|PasswordAuthentication|Include)' /etc/ssh/sshd_config


This lists the active lines that set either option, with line numbers. On the test image it showed:

				
					1:PermitRootLogin yes
2:PasswordAuthentication yes
26:Include /etc/ssh/sshd_config.d/*.conf


Any line with a lower number than the Include line, so above it in the file, beats every small file. Create your own settings file either way:

				
					sudo nano /etc/ssh/sshd_config.d/00-hardening.conf


The 00- sorts this file before 50-cloud-init.conf. Paste these two lines, save with Ctrl+O and Enter, and close with Ctrl+X:

				
					PasswordAuthentication no
PermitRootLogin no


Some guides name this file 99-something, but a 99- file is read last, so any earlier file that sets the same option beats it. On the tested image this file alone wasn’t enough: after a restart, sshd -T still printed yes for both, because lines 1 and 2 are read first. If your main file has such lines, open it:

				
					sudo nano /etc/ssh/sshd_config


Put a # at the start of each PermitRootLogin or PasswordAuthentication line above Include, turning it into a comment, and change nothing else.

				
					sudo sshd -t


This checks the settings for mistakes; no output means none.

				
					sudo systemctl restart ssh


This applies the settings while your open sessions stay connected. Run the sshd -T check again, and both lines should now read no, as they did on the test server. Then, from a new window, try a password-only login:

				
					ssh -o PubkeyAuthentication=no -o PreferredAuthentications=password,keyboard-interactive yourname@203.0.113.10


This tells SSH to skip your key and try a password. On the test server, it failed, and so did root with a valid key:

				
					yourname@203.0.113.10: Permission denied (publickey).


A normal key login as yourname should still work. Only then close the first window. Leave SSH on port 22, because on Ubuntu 26.04 SSH starts through a systemd socket, and changing the port takes extra steps.

Set Up the UFW Firewall in the Right Order So You Don’t Lock Yourself Out

UFW (Uncomplicated Firewall) is the server’s own firewall, and it was off on the tested image, as it is by default. Allow SSH before you switch it on, because UFW blocks every incoming connection it hasn’t been told about, including yours.

				
					sudo ufw allow OpenSSH


This allows SSH on port 22 through UFW’s ready-made OpenSSH profile.

				
					sudo ufw enable


UFW warns “Command may disrupt existing ssh connections. Proceed with operation (y|n)?”; type y, and it stays on after every reboot.

				
					sudo ufw status verbose


This should show “Status: active”, “Default: deny (incoming), allow (outgoing)”, and the OpenSSH rule.

UFW says SSH is open to “Anywhere”, but the panel rule still limits port 22 to your address, because there are two firewalls in a row. The panel’s firewall filters traffic before it reaches the server (plus a forward, if you use the router IP), and UFW filters it on the server. A port has to be open in both, and either one can block it. If you lock yourself out, the panel’s browser console still works without the network. Log in there as your sudo user and run sudo ufw allow OpenSSH. If you’ve lost that password too, reset the root password from the N6 Cloud panel and log in to the console as root. Turning off root logins earlier in this step only affects SSH, not the console. Ubuntu’s UFW documentation covers rules beyond the profiles.

A web server install feeding a configuration step that publishes a first web page to a browser

Step 3: Install a Web Server and Publish Your First Page

The server is locked down, and now it needs something to show the world. One package and one settings file turn it into a web host. You’ll reach the page by IP address first, which proves every layer works before DNS joins in.

Install Nginx on Ubuntu 26.04 and See It by IP

Nginx is light on memory and is the web server most current guides use. Apache works well too, but the commands from here on are for Nginx.

				
					sudo apt install nginx -y


This installs and starts Nginx (version 1.28.3 on the test server) and adds its UFW profiles.

				
					sudo ufw allow 'Nginx Full'


This opens ports 80 and 443 in UFW. You’ll also see an Nginx QUIC profile for HTTP/3, which you don’t need here.

Next, add panel ingress rules for TCP 80 and 443 from 0.0.0.0/0 (anyone), or, on the router IP, forward those ports and add the same two firewall rules. Then open http://203.0.113.10 with your own address. You should see “Welcome to nginx!”, as the test did. If the browser waits and gives up, one of the two firewalls is still closed, so check the panel rule first.

Upload Your Site and Give It a Server Block

Your site needs a folder your user owns and a server block, which is Nginx’s settings for one site: the names it answers to and the folder it serves. Replace example.com with your domain in every command.

				
					sudo mkdir -p /var/www/example.com/html


This creates the site folder, with -p adding any missing parent folders.

				
					sudo chown -R yourname:yourname /var/www/example.com/html


This makes your user the owner, so you can upload without sudo, while Nginx can still read the files.

				
					nano /var/www/example.com/html/index.html


This opens a new page on the server. Paste this test page and save; you’ll replace it with your real site later:

				
					<!doctype html>
<html><head><title>It works</title></head><body><h1>Hello from my first cloud server</h1></body></html>


Now create the server block itself:

				
					sudo nano /etc/nginx/sites-available/example.com


Paste this block, then save and close:

				
					server {
    listen 80;
    listen [::]:80;
    server_name example.com www.example.com;
    root /var/www/example.com/html;
    index index.html;
}


It answers plain HTTP for both names and serves your folder; Certbot adds HTTPS in Step 4, and a missing page gets a 404 error.

				
					sudo ln -s /etc/nginx/sites-available/example.com /etc/nginx/sites-enabled/


This links the file into sites-enabled, the folder Nginx reads.

				
					sudo nginx -t


This tests every setting before you apply it. A healthy result ends with “nginx: configuration file /etc/nginx/nginx.conf test is successful”; never reload after a failed test.

				
					sudo systemctl reload nginx


This applies the change without dropping visitors.

Uploading your real files is a separate step from the test page. When your real site is ready, run this on your own computer, not the server, from the folder that holds your site:

				
					scp index.html yourname@203.0.113.10:/var/www/example.com/html/


This copies your index.html over the test page. For a whole site, connect with sftp [email protected], run cd /var/www/example.com/html, then put -r site/*, where site is your local folder, so its contents land directly in html. A graphical SFTP client such as FileZilla works too, with the same key and your sudo user, never root.
A DNS record pointing a domain to a server, then the site opening in a browser over HTTPS

Step 4: Go Live With a Domain and Free HTTPS

To host a website on a cloud server under your own name, you point the domain at the server, wait for DNS caches to catch up, and then ask Let’s Encrypt for a certificate. The order matters. Let’s Encrypt checks that your domain reaches your server before it issues anything, so the request fails if DNS isn’t ready.

Point Your Domain: A and www Records

Two DNS records point your domain to the server. Add them where your domain’s DNS is managed, usually your registrar or a DNS host; read about DNS options for a self-managed server if you’re unsure which you use. Table 2 shows the two records.

Type Host (name) Value TTL (seconds)
A
@ (example.com itself)
203.0.113.10
300
CNAME
www
example.com (or an A record to 203.0.113.10)
300

The TTL (time to live) is how long other DNS servers may keep a copy of the answer. What people call propagation is those copies running out, which takes from minutes to as long as the old record’s TTL, sometimes a full day. If you’re moving a domain that already points elsewhere, set its TTL to 300 a day before the switch. If the domain has an old AAAA record (an IPv6 address) pointing to a previous host, delete it, or some visitors will reach the old host. Then check:

				
					dig +short example.com @1.1.1.1


This asks a public DNS service which address your domain points to; it should print your server’s IP. On Windows, nslookup example.com 1.1.1.1 does the same job.

Free SSL With Let’s Encrypt and Certbot

Certbot gets a free certificate from Let’s Encrypt, turns on the HTTP-to-HTTPS redirect, and renews it on a timer. Before you start, the dig check above must pass. Port 80 must also be open in both firewalls, because Let’s Encrypt’s standard check only works on port 80.

				
					sudo snap install --classic certbot


This installs Certbot as a snap, the method recommended by the EFF, the non-profit that makes Certbot; the test server got Certbot 5.9.0. Ubuntu 26.04’s own package is 4.0.0, which predates the renewal-timing feature (ARI) Let’s Encrypt now recommends.

				
					sudo certbot --nginx -d example.com -d www.example.com


This requests one certificate for both names and installs it into your server block. Certbot asks for an optional email address and your agreement to the Let’s Encrypt terms. On the test server, it finished in 18 seconds with:

				
					Congratulations! You have successfully enabled HTTPS on https://example.com and https://www.example.com


Certbot also adds the redirect from http:// to https://, which is on by default with --nginx; on the test server, both names redirected to HTTPS.

				
					sudo certbot renew --dry-run


This rehearses a renewal without changing anything. It should end with “Congratulations, all simulated renewals succeeded”, which took 12 seconds in the test.

The renewal timer is called snap.certbot.renew.timer, and it matters more each year. Let’s Encrypt’s certificates last 90 days today, 64 days from 10 February 2027, and 45 days from 16 February 2028. Let’s Encrypt also stopped sending expiry emails in June 2025, so nothing warns you by default. Run the dry run after any server change, and consider an external monitor that checks certificate expiry.

Final launch checklist: run these checks before you share the address.

  • http://example.com lands on https://example.com.
  • Both example.com and www.example.com load over HTTPS.
  • A made-up page such as example.com/nope returns a 404 error.
  • sudo ufw status lists only OpenSSH and Nginx Full, each also shown with (v6).
  • The panel firewall allows port 22 from your address only.
  • sudo sshd -T shows no for passwordauthentication, kbdinteractiveauthentication, and permitrootlogin.
  • sudo certbot renew --dry-run succeeds.
  • A new disk-only snapshot is saved.
  • The DNS TTL is back to a normal value, such as 3600.

Five diagnostic panels for a site that won't load, from network and DNS to the web server, app, database, and outside services

Site Not Loading? A Five-Point Diagnosis

If a check fails or the site won’t load after your cloud server setup, the fault is in one layer. A request passes through DNS, two firewalls, Nginx, and your files, and each fails with its own symptom. Test them from the outside in and stop at the first one that fails.

DNS, Firewall, or Nginx: Find the Broken Layer

Five checks, in order, find the broken layer:

  1. DNS: dig +short example.com @1.1.1.1 should return the server’s address.
  2. Panel firewall: the IP needs rules for 80 and 443. A browser that waits and times out points here or to check 3, and the two firewalls fail the same way, so check both before you move on.
  3. UFW: sudo ufw status should list Nginx Full.
  4. Nginx: sudo nginx -t should pass, and systemctl status nginx should say “active (running)”. “Connection refused” means nothing is listening.
  5. Error log: if a page loads but shows an error, the log says why.

A broken setting shows up at check 4: when N6 Cloud’s test added a stray } to a settings file, sudo nginx -t printed “unexpected “}”” with the file and line, then “test failed”. For check 5, read the newest log lines:

				
					sudo tail -n 20 /var/log/nginx/error.log


This prints the last 20 lines of Nginx’s error log, each naming the file or address and the reason. Figure 4 maps each symptom to its layer.
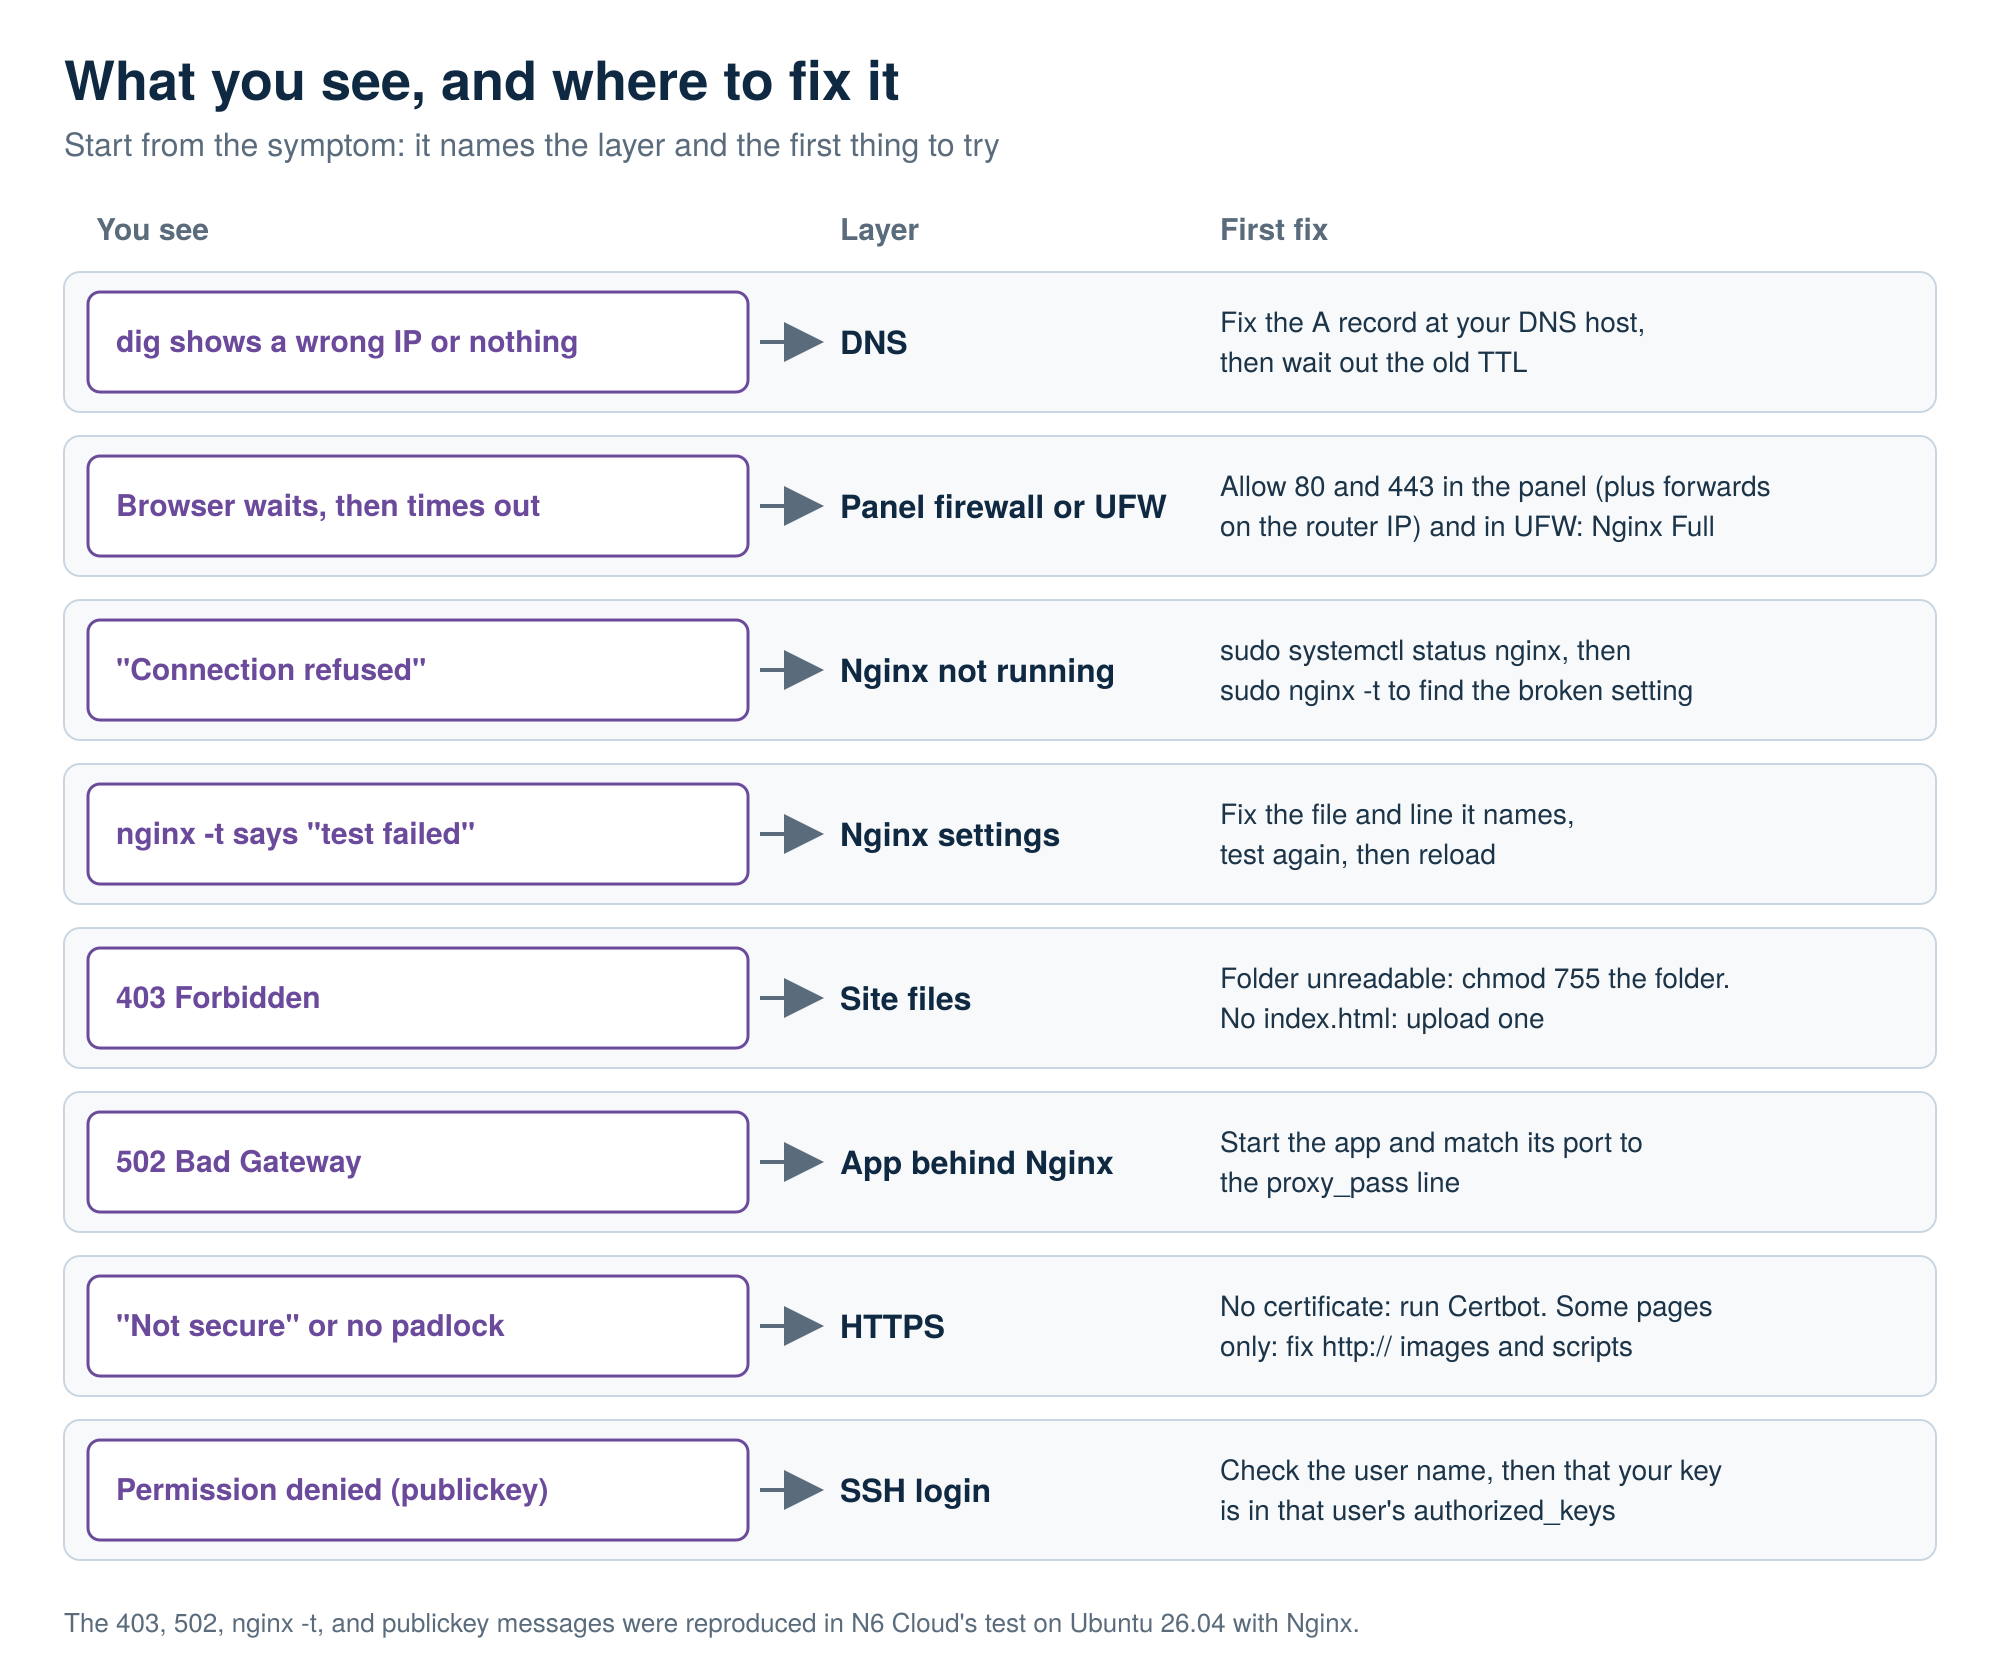
Cloud server setup troubleshooting, symptom to layer: eight errors such as timeouts, 403, 502, and Permission denied, each with its layer and first fix
Figure 4. Each layer fails with its own symptom, so the symptom tells you where to start.

Four Errors New Server Owners Hit, and How to Fix Each

Four messages cover most first-week problems, and N6 Cloud’s test reproduced each one by breaking a working setup. “Permission denied (publickey)” from SSH means the server accepted none of your keys: the wrong key file, the wrong user name, or a public key missing from that user’s authorized_keys. Check the user name first. If authorized_keys is missing, use the panel’s browser console to run sudo rsync --archive --chown=yourname:yourname /root/.ssh /home/yourname.

A 403 Forbidden page means Nginx found the folder but couldn’t show it, and the log gives one of two reasons. “(13: Permission denied)” means Nginx can’t read your files; in the test, a folder set to 700 caused it, and sudo chmod 755 on the folder fixed it. “directory index of … is forbidden” means there’s no index.html, so upload one or check its name.

A 502 Bad Gateway page comes with this log line:

				
					connect() failed (111: Connection refused) while connecting to upstream


Nginx is passing requests to an app, such as a Node.js or Python app, that isn’t running. Start the app and check that its port matches the proxy_pass line in your server block.

A “Not secure” warning has three usual causes. Before Certbot runs there’s no certificate, and in the test https:// failed outright while http:// worked. If http:// doesn’t redirect, run the Certbot command again. If only some pages lose the padlock, they load images or scripts over http://, called mixed content; this guide to clearing mixed content after HTTPS shows the fix.

Off Costs Less, Not Nothing: Stop, Snapshot, or Delete?

While a cloud server on N6 Cloud runs, you pay for its CPU and memory, its disk, and any additional IP. Stopping it stops the charge for CPU and memory, but not for the disk or the additional IP. On many hourly-billed clouds, a stopped server keeps billing for compute too, because its capacity stays reserved, so check the rule wherever you host.

The disk charge continues because your data is still stored. The additional IP is the trap: it’s billed by the hour whether its server is running, stopped, or gone, while the cloud’s router IP is free. In N6 Cloud’s test, deleting a server didn’t release its additional IP: it stayed in the account, unattached and billed, until it was deleted from the IP list. Deleting the server also removed that IP’s firewall rules. This is why the free router IP, forwarded to one server, is the cheaper choice for a single site. Table 3 sums up the choices.

Action CPU and memory charged Disk charged Additional IP charged What you keep When to use it
Stop the server
No
Yes
Yes
Everything, ready to start again
A pause of hours or days
Snapshot, then delete the server
No
No server disk (check your billing page for snapshot storage)
Yes, until you release the IP
A copy you can restore later
A project you might come back to
Delete the server and release the IP
No
No
No
Nothing
A finished practice server

For a practice server, take a snapshot if you might want it back, delete the server, and release any additional IP. A day later, open the billing page. It lists compute, each disk, and each additional IP as separate hourly lines, so anything still billing is easy to find.

What’s Next: Watch Your Server, Then Build On It

After launch, your job shifts to noticing problems before visitors do. Set up a free external uptime check, a service that loads your site every few minutes and emails you when it stops answering. On the server, htop shows live CPU and memory use, df -h shows free disk space, and journalctl -u nginx --since today lists today’s Nginx messages. A minute with these each week teaches you what normal looks like. For warnings before a problem, read about setting alerts for CPU and disk use.

The same server can then grow into bigger projects. WordPress adds PHP and a MySQL or MariaDB database, so plan for 2 GB of memory, or choose managed WordPress hosting if you’d rather not run the server. A staging server built from a snapshot lets you test changes on a copy before they reach the live site. Docker runs apps in containers, keeping each app’s software separate from the rest of the server.

Security doesn’t stop at launch either. Step 2 covered logins and ports, but the site itself needs updates, backups, and strong passwords as it grows. These security steps for after launch cover what to add once your site has visitors.

A server cabinet opened to show compute, storage, network, backup, and security, beside an N6 Cloud badge

Why Trust N6 Cloud for Your First Cloud Server?

A first server should be cheap to learn on and easy to recover when a step goes wrong. N6 Cloud is a Canadian company based in British Columbia, and its cloud servers are hosted in Vancouver, so your data stays in Canada and sits close to Canadian visitors. Billing is hourly and post-paid, and a stopped server drops its compute charge, as the cost section shows. Each charge appears as its own line on the bill.

There’s also room for mistakes. You can create up to three snapshots and roll back a change that went wrong; check your billing page for snapshot storage. The panel firewall controls which ports reach the server, and the browser console works even when SSH doesn’t, so a firewall slip doesn’t lock you out for good. When the site grows, you resize the server up or down from the panel instead of moving to a new one. N6 Cloud’s support team, with more than 20 years in web hosting, answers support tickets 24/7 when a step doesn’t go as planned.

If you’re ready to set up a cloud server of your own, start with cloud hosting billed by the hour and follow this guide from Step 1. Choose Ubuntu 26.04 and a size that matches your site. When you’ve finished with a practice server, Table 3 shows what still bills after each choice.


Frequently Asked Questions

How much does it cost to run a basic cloud server?

Across the market, a 1 to 2 GB cloud server costs about CAD 5 to 16 (USD 4 to 12) a month. With hourly billing, a practice server for an afternoon costs cents. An additional public IP or a large disk adds to the bill, and the section on stopping and deleting servers explains which charges continue.

How long does it take to set up a cloud server?

Plan about an hour the first time, plus DNS waiting time. In N6 Cloud’s test, the server showed as ON about a minute after Create, and the commands from first login to a working HTTPS site took about 15 minutes, with DNS already in place. Reading each step first takes longer.

Do I need Linux experience to set up a cloud server?

No. If you can copy commands carefully and read what comes back, you can follow this guide. Three skills make it much easier: moving between folders with cd and ls, editing a file in nano, and reading the end of a log with tail.

Do I still need a firewall if my provider has one?

Yes, because the two layers protect against different mistakes. If you open a panel rule too widely, UFW still blocks everything you didn’t allow on the server. If UFW gets switched off during a change, the panel rules still filter traffic before it arrives.

Am I billed if my cloud server is powered off?

On N6 Cloud, a powered-off server is billed for its disk and any additional IPs, but not for CPU, memory, or the free router IP. At any provider, open the billing page and look for separate lines for compute, disk, and IP addresses, so you know which ones keep running.

Related Posts