A customer pays for an order at 9:40 PM, and it lands on the old server you switch off the next morning. A contact form goes quiet for three days before anyone notices. When a site breaks during a host move, the copying is rarely the cause: the steps were done in the wrong order, or DNS was switched at the wrong moment.
To migrate WordPress to a new host without losing anything, you need that order right. This plan keeps your domain the same (the FAQ covers domain changes). It starts about 48 hours before the switch and gives you the exact cutover order and a rollback plan.
What “Zero Downtime” Really Means When You Move a WordPress Site
Zero downtime means every visitor reaches a working copy of your site during the move, and no order or message lands on a server you’re about to retire. It doesn’t mean everyone moves to the new server at the same second. For a while, some people reach the old server and some the new one, a state often called split-brain.
The window exists because of how DNS, the internet’s address book, works. A visitor’s resolver is the lookup service run by their internet provider or by a public service such as Google’s. It finds your server’s address and keeps a copy for a set time called the TTL. Nothing is pushed out when you change the record, so what people call DNS propagation is really caches expiring one by one.
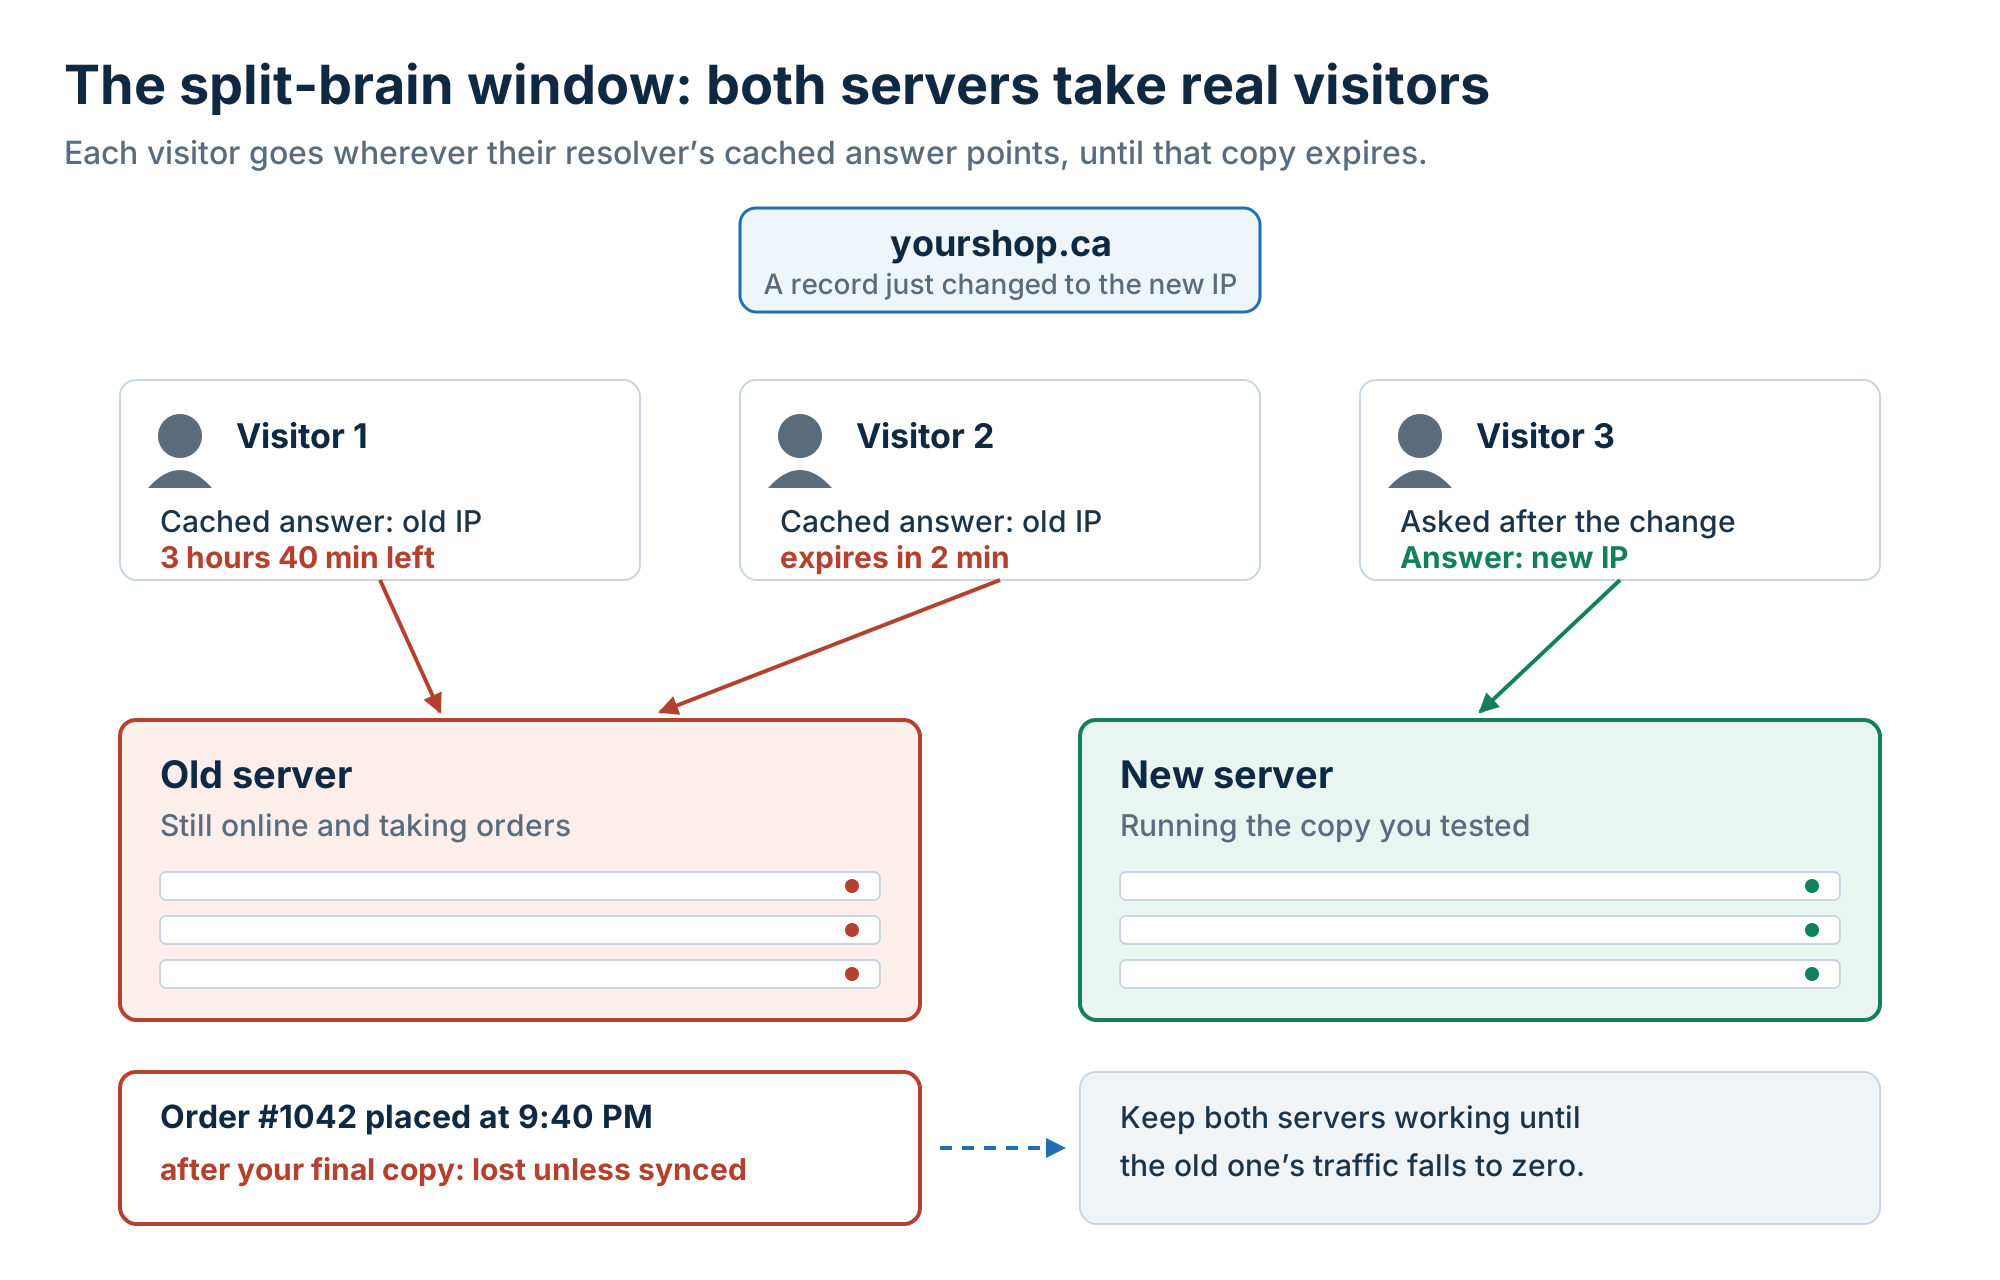 Figure 1. During the switch, both servers take real visitors, and anything written to the old one after your final copy has to be carried across.
The old server therefore has to stay online until every cache has caught up, which is why you never cancel the old plan on the day of the switch. Two things can’t be hidden. A store that pauses checkout for a few minutes during the final copy is down for anyone trying to buy. A few visitors behind unusual caches may also reach the new server later than the rest.
Before You Move: Your WordPress Migration Checklist
Three jobs come first: audit and back up the site, lower the DNS TTL, and set up the new host to match the old one. None of them changes what your visitors see. They decide how short the switch will be and how much can go wrong on the day.
Audit and Back Up What You’re Moving
Most problems after a move come from parts nobody thinks of as part of the site. Scheduled tasks, mailboxes, DNS records, and outside services that know your server’s address all break quietly. You find out days later. Before you change anything, go through this list and write down what you find.
- PHP version and the PHP extensions the site uses
- Database size and total file size
- File count, also called inodes (each file or folder is one inode, and some plans limit the number)
- Real cron jobs set in cPanel, plus WordPress’s own scheduler (WP-Cron), which runs only when someone visits
- Mailboxes and forwarders on the current host
- Every DNS record (A, AAAA, MX, TXT, and CNAME), exported or screenshotted now
- Outside services tied to your server’s address or domain: payment webhooks, SMTP relays, API allowlists, and a CDN
Next, take a full copy of the files and the database and download it to your own computer or cloud storage. Keep it untouched as your copy of the old site. Your old host’s backups don’t replace it, since they live on the account you’re about to close. The same habits apply if you already follow a staging workflow for risky WordPress changes.
Lower Your DNS TTL a Day or Two Before the Switch
Lowering the TTL to about 300 seconds a day or two ahead shortens the split-brain window to minutes for most visitors. TTL stands for time to live: the number of seconds a resolver may keep a DNS answer before asking again. At 300 seconds, resolvers check back every five minutes.
The catch is timing. A resolver only learns the new, shorter TTL when its cached copy expires, so a lowered TTL does nothing until one full old TTL has passed. A record at 86,400 seconds needs lowering at least 24 hours before the switch. On many cPanel hosts, four hours is enough, since the default TTL for records in new zones is 14,400 seconds. Hosts can change that default, so lowering it a day ahead is the safe choice.
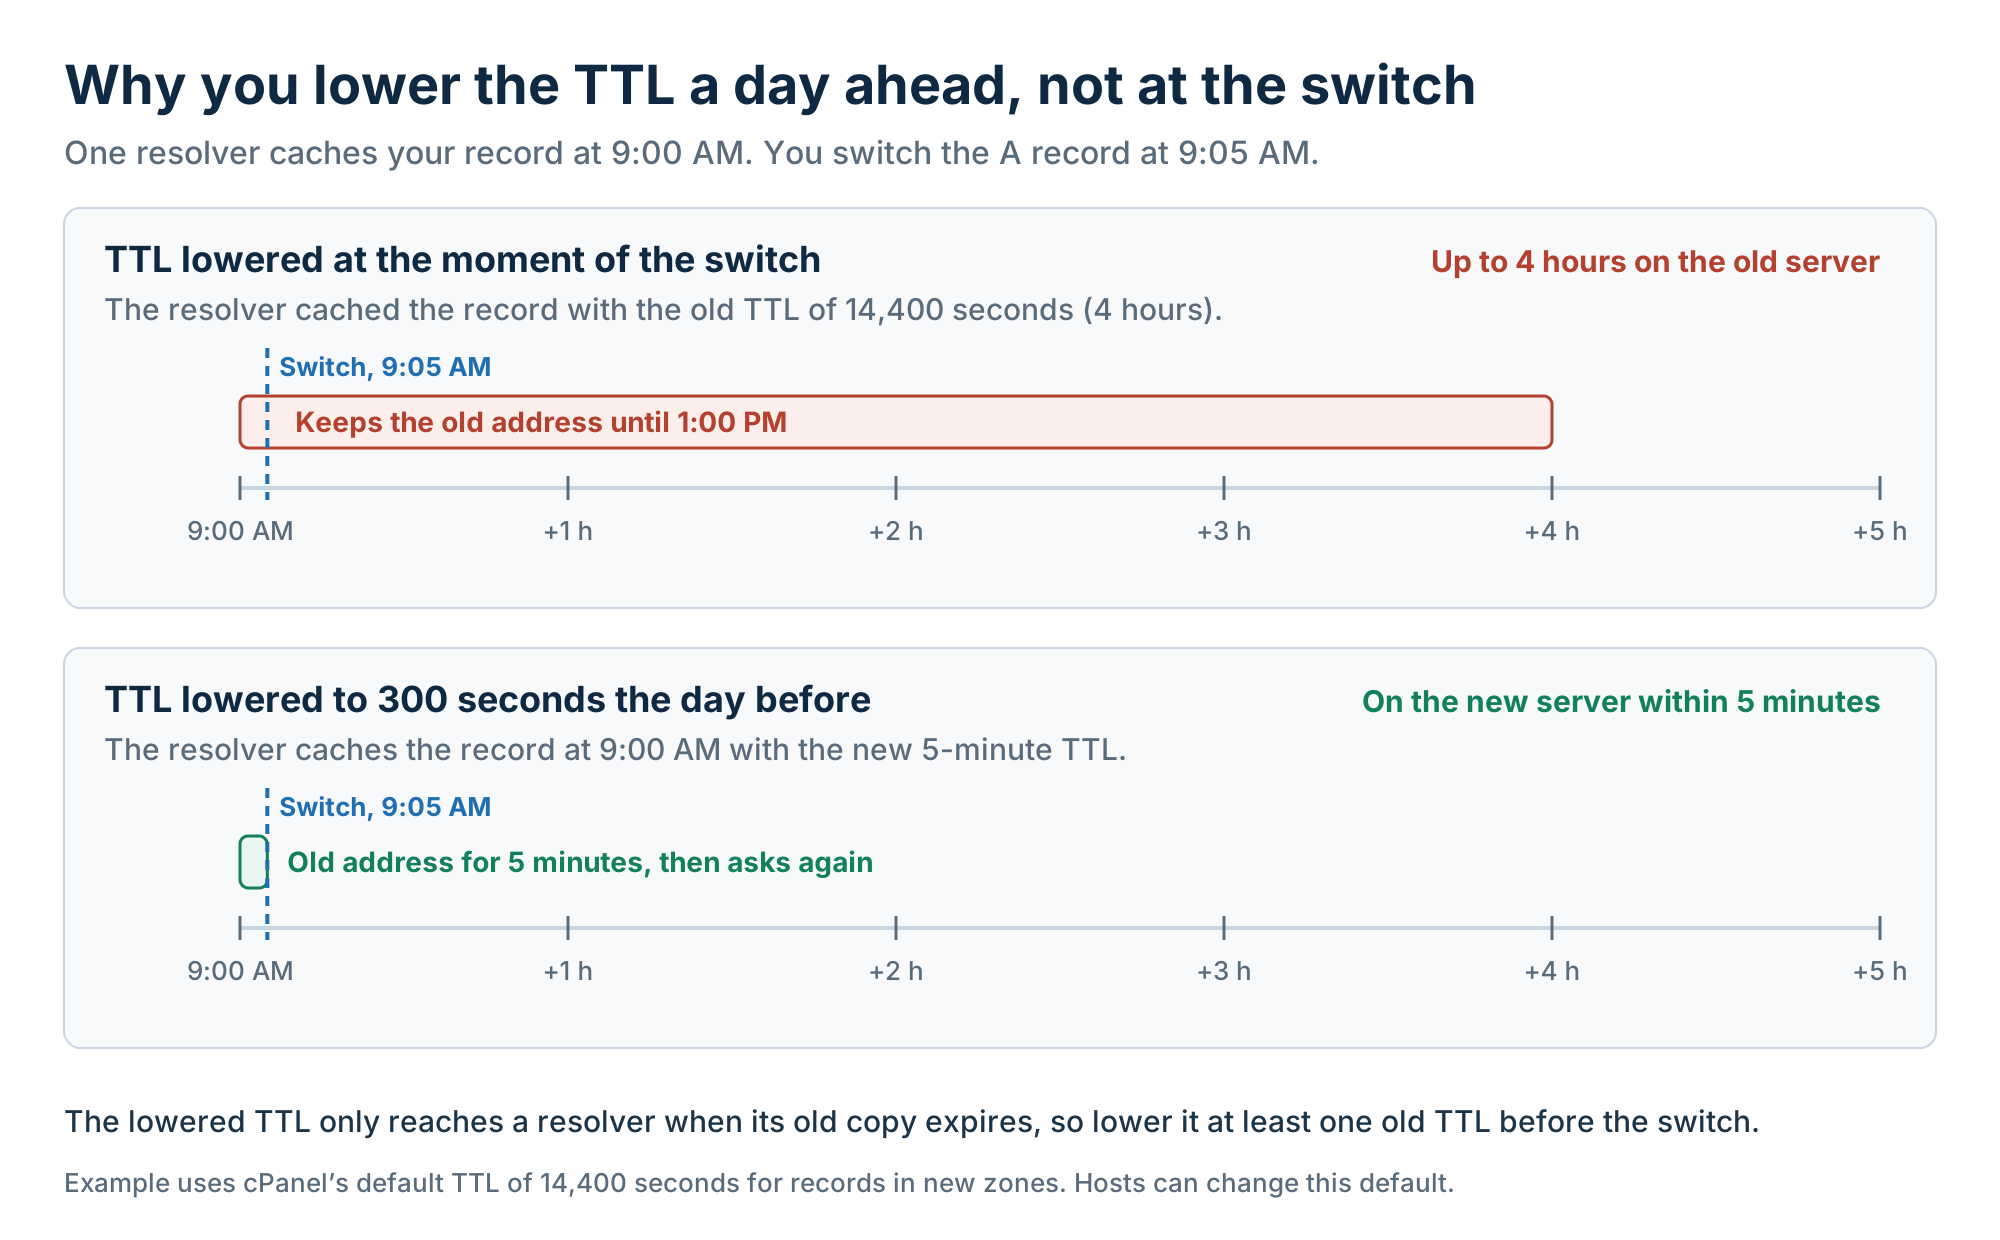 Figure 2. The same resolver and the same switch time: only lowering the TTL changes how long visitors keep the old address.
Change the TTL wherever your DNS is managed today. To find it, look up your domain’s nameservers with a WHOIS or DNS lookup tool, or ask your registrar: their names usually show which company runs your DNS. In cPanel, open Zone Editor, click Manage next to the domain, click Edit on the A record, type the new value in the TTL field, and click Save Record. After the move, set the TTL back to its usual value.
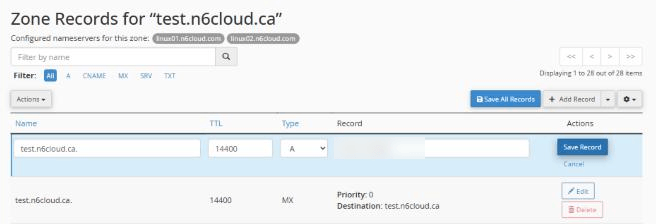
Figure 3. Lowering the TTL in cPanel’s Zone Editor, in our test account: edit the A record, change 14400 to 300, and save. Screens vary by host.
Prepare the New Host So It Mirrors the Old One
On day one, the new server should run your site exactly as the old one does. Match the PHP version and extensions first, even if the new host offers something newer, and upgrade PHP later as a separate step. In cPanel, the page for this is Select PHP Version on some servers and MultiPHP Manager on others. If something breaks after the switch, you want only one possible cause, not three.
Whichever WordPress hosting plan you move to, set up the account in the same order. Add your domain, then create an empty database and a database user in cPanel. cPanel puts your account username and an underscore in front of both names, so shop becomes something like acct_shop. That’s why wp-config.php usually changes (see Option C). Leave mailboxes until the website has moved (the email section explains why), and skip a fresh WordPress install unless your migration tool asks for one.
How to Migrate a WordPress Site to a New Host, Step by Step
You can copy the site yourself with a migration plugin, a tool in the new host’s control panel, or WP-CLI on the command line. You can also ask the new host’s team to do it. The choice depends mostly on your site’s size and your comfort with a command line, and the test and cutover steps that follow stay the same.
Plugins usually fail on big sites because they upload through the browser and run long PHP requests, and the host limits both. PHP’s own defaults allow a 2 MB upload, 128 MB of memory, and 30 seconds per request. On one cPanel account we checked, the limits were 300 seconds per request, 768 MB of memory, and 128 MB for uploads. That’s why large sites usually move with a server-side tool or by hand, and Table 1 compares the four routes.
wp db export passes these options to mysqldump. With –single-transaction, it takes a snapshot of WordPress’s InnoDB tables without locking them, so the site keeps working, and –quick copies large tables row by row instead of loading them into memory. With the same domain, nothing in the database needs rewriting: in our test, WP-CLI’s search-replace refused to run when the old and new addresses were identical. If a URL ever does have to change, use WP-CLI’s search-replace command and run it with –dry-run first.
Without SSH, phpMyAdmin’s Export and Import do the database part, with files copied by SFTP and wp-config.php edited in File Manager. Its import has a size cap, so a large database needs WP-CLI or your host’s help. “Error establishing a database connection” means a database value is wrong, and a fresh install screen usually means the table prefix doesn’t match. In our test, rsync brought .htaccess across, and only DB_NAME, DB_USER, and DB_PASSWORD had to change.
Or Let the New Host Move It for You
Many hosts migrate a site for free when you sign up, which hands the copying to people who move sites often and know the common problems. Whether visitors notice still depends on timing, so settle the details before you open the ticket. Ask who copies the files and database, who runs the final sync and the DNS switch, whether the team tests the copy before cutover, and how long the move takes.
Whatever the answers, some jobs usually stay yours. You lower the TTL a day ahead, decide when to freeze checkout, and keep your email records pointing where they should. Only you know when your site is quiet and where your mail lives. Test the team’s copy through your hosts file (see the next section) before you agree to switch, since a problem found then costs nothing. If you’d also like updates and upkeep handled after the move, managed WordPress hosting adds that on top.
Test the New Server Privately With Your Hosts File
Your computer’s hosts file lets you open your real domain on the new server before anyone else sees it. It overrides DNS on that one machine only, while every other visitor still reaches the old server, so you test the site at its real address with its real links and logins. Add one line with the new server’s IP address and your domain names.
On Windows, the file is at %SystemRoot%\System32\drivers\etc\hosts, and you need to run your text editor as administrator to save it. Run ipconfig /flushdns afterwards to clear cached answers. On a Mac, run sudo nano /etc/hosts in Terminal, which asks for your password. Remove the line when you’re done, or you won’t be able to tell when DNS has moved.
With the line in place, use the site as a customer would: open the home page, a product, and the cart, then run a checkout in test mode. Log in, send the contact form, check that images load, open wp-admin, and trigger one scheduled task. Anything that fails here would have failed for every visitor, so fix it now.
Testing at the real address is also what lets you skip the search-replace step mentioned in Option C. A temporary URL would mean rewriting every URL in the database, and doing that by hand in the SQL file breaks serialized data. WordPress stores some settings with each value’s length recorded, so a changed URL of a different length corrupts the whole setting.
The Cutover Window: Keep Orders, Forms, SSL, and Email Working
The cutover is the short period between your final copy and the DNS switch. If you don’t plan for it, four things can fail: new orders, form entries, the SSL certificate, and email. The three sections below take them in the order you deal with them on the day.
Freeze or Sync: Protect WooCommerce Orders and Form Entries
Anything written to the old database after your copy, such as an order, a form entry, or a new customer account, is lost at the switch unless you plan for it. You have three options, and the right one depends on how busy the site is. If you’re still weighing whether your store needs WooCommerce hosting, decide before the move, so you only move the store once.
A short freeze suits most small stores and brochure sites. Pause checkout and forms with a maintenance mode plugin, or with a catalogue mode plugin that keeps products on show but removes the buy buttons. If you put up a full maintenance page, check that it returns a 503 status, which tells search engines the pause is temporary. WooCommerce’s built-in “coming soon” mode isn’t a substitute, because it’s meant for launches and returns a normal page instead.
The freeze starts just before the final copy and lasts until DNS points to the new server, then lifts on the new server only. After a plugin move, the final copy is a fresh export and import. After a host-assisted move, the host re-runs the migration during the freeze, so agree on a time with the host and ask how long it will take. In our test, an order placed on the old server after the first copy reached the new server once we imported a fresh export there.
A store taking orders more often than the freeze would last can’t pause, so it copies only the rows created since the first copy, a method called a delta sync. Stores created on WooCommerce 8.2 or later keep orders in their own tables by default. This feature is called High-Performance Order Storage (HPOS), and a sync that copies only WordPress posts misses those orders entirely. Older stores may have switched to it too, and WooCommerce > Settings > Advanced > Features shows which storage yours uses.
With your site’s table prefix in front, sync wc_orders, wc_orders_meta, wc_order_addresses, wc_order_operational_data, woocommerce_order_items, its item meta, the order notes, and the placeholder row each order gets in the posts table. Add the user tables and your form plugin’s entry tables too. Delete any test orders on the new server first: in our test, a test order there took the same order number as a late order on the old server. Copied rows keep their numbers, so orders taken on both servers can clash the same way. A busy store’s delta sync is a job for a developer or a sync tool.
A third route exists only if your DNS is already on a proxy service such as Cloudflare, with the site’s records proxied. Visitors’ resolvers then hold the proxy’s addresses, not your server’s, so changing the origin server in the proxy’s dashboard moves traffic without waiting for their caches. Moving your nameservers to a proxy on the day itself brings back the nameserver delay explained in the email section.
Whichever route you take, never re-import the full database onto the new server once it’s live. Orders placed there since the switch would be overwritten by the older copy, as Figure 4 shows. Payment webhooks that call your domain follow DNS as visitors do, so for a few minutes some may still reach the old server. Check your payment provider’s webhook log after the switch and resend any that failed. Any outside service that allows your server by IP address also needs the new address added.
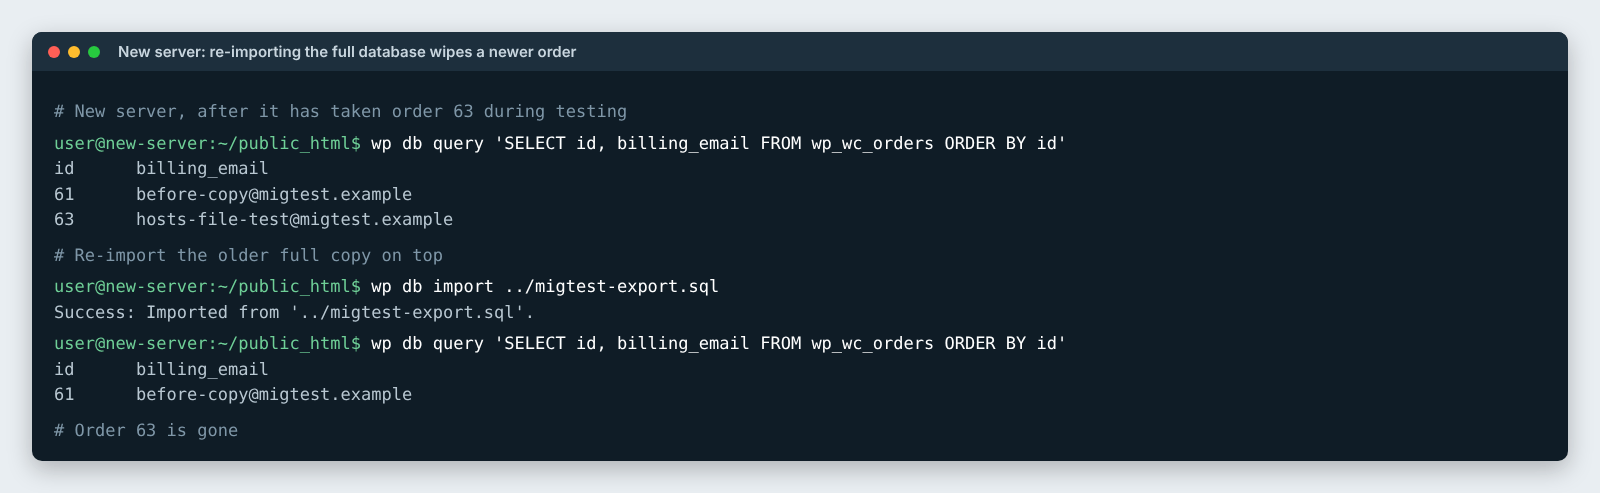 Figure 4. In our test, re-importing the older full copy onto the new server deleted an order the new server had already taken.
Get SSL Ready Before DNS Points to the New Server
The new server can’t get a free certificate the usual way while your domain still points at the old server. Let’s Encrypt’s standard HTTP check fetches a file through your domain, which still leads to the old server. AutoSSL, the cPanel tool that requests and renews free certificates, uses the same kind of check and fails for the same reason. Let’s Encrypt’s guide to challenge types explains both kinds of checks, and Figure 5 helps you pick a route before the switch.
Move your existing SSL certificate. A certificate belongs to the domain name, not the server’s IP address, so a valid one keeps working on a new server. Export the certificate and its private key from the old host and install them in cPanel’s SSL/TLS section, under Manage SSL Sites. Some hosts don’t allow exporting the key.
Validate by DNS. When the file check fails, AutoSSL falls back to proving control with a DNS record, and that check works wherever your website points. According to cPanel’s documentation, it succeeds only when the domain’s DNS is managed on that same cPanel server, because AutoSSL adds the record to the zone itself. It suits you if you’re moving your nameservers to the new host anyway. Before you change them, edit the A record in the new zone to point at the old server, since cPanel fills it in with the new server’s address. Once the nameserver change has taken effect and the SSL status page shows the domain as validated, switch the A record to the new server.
Switch at a quiet hour and get AutoSSL to run straight away. If neither route fits, switch DNS when traffic is lowest. AutoSSL runs and renews on its own schedule, so don’t wait for it. As soon as the new server answers for your domain, check the SSL/TLS Status page, or the Status tab under SSL/TLS Certificates, depending on your cPanel. If your host shows a Run AutoSSL button there, click it; if not, ask the host’s support to run it. Some visitors may see a warning until it’s issued, which is why this route comes last.
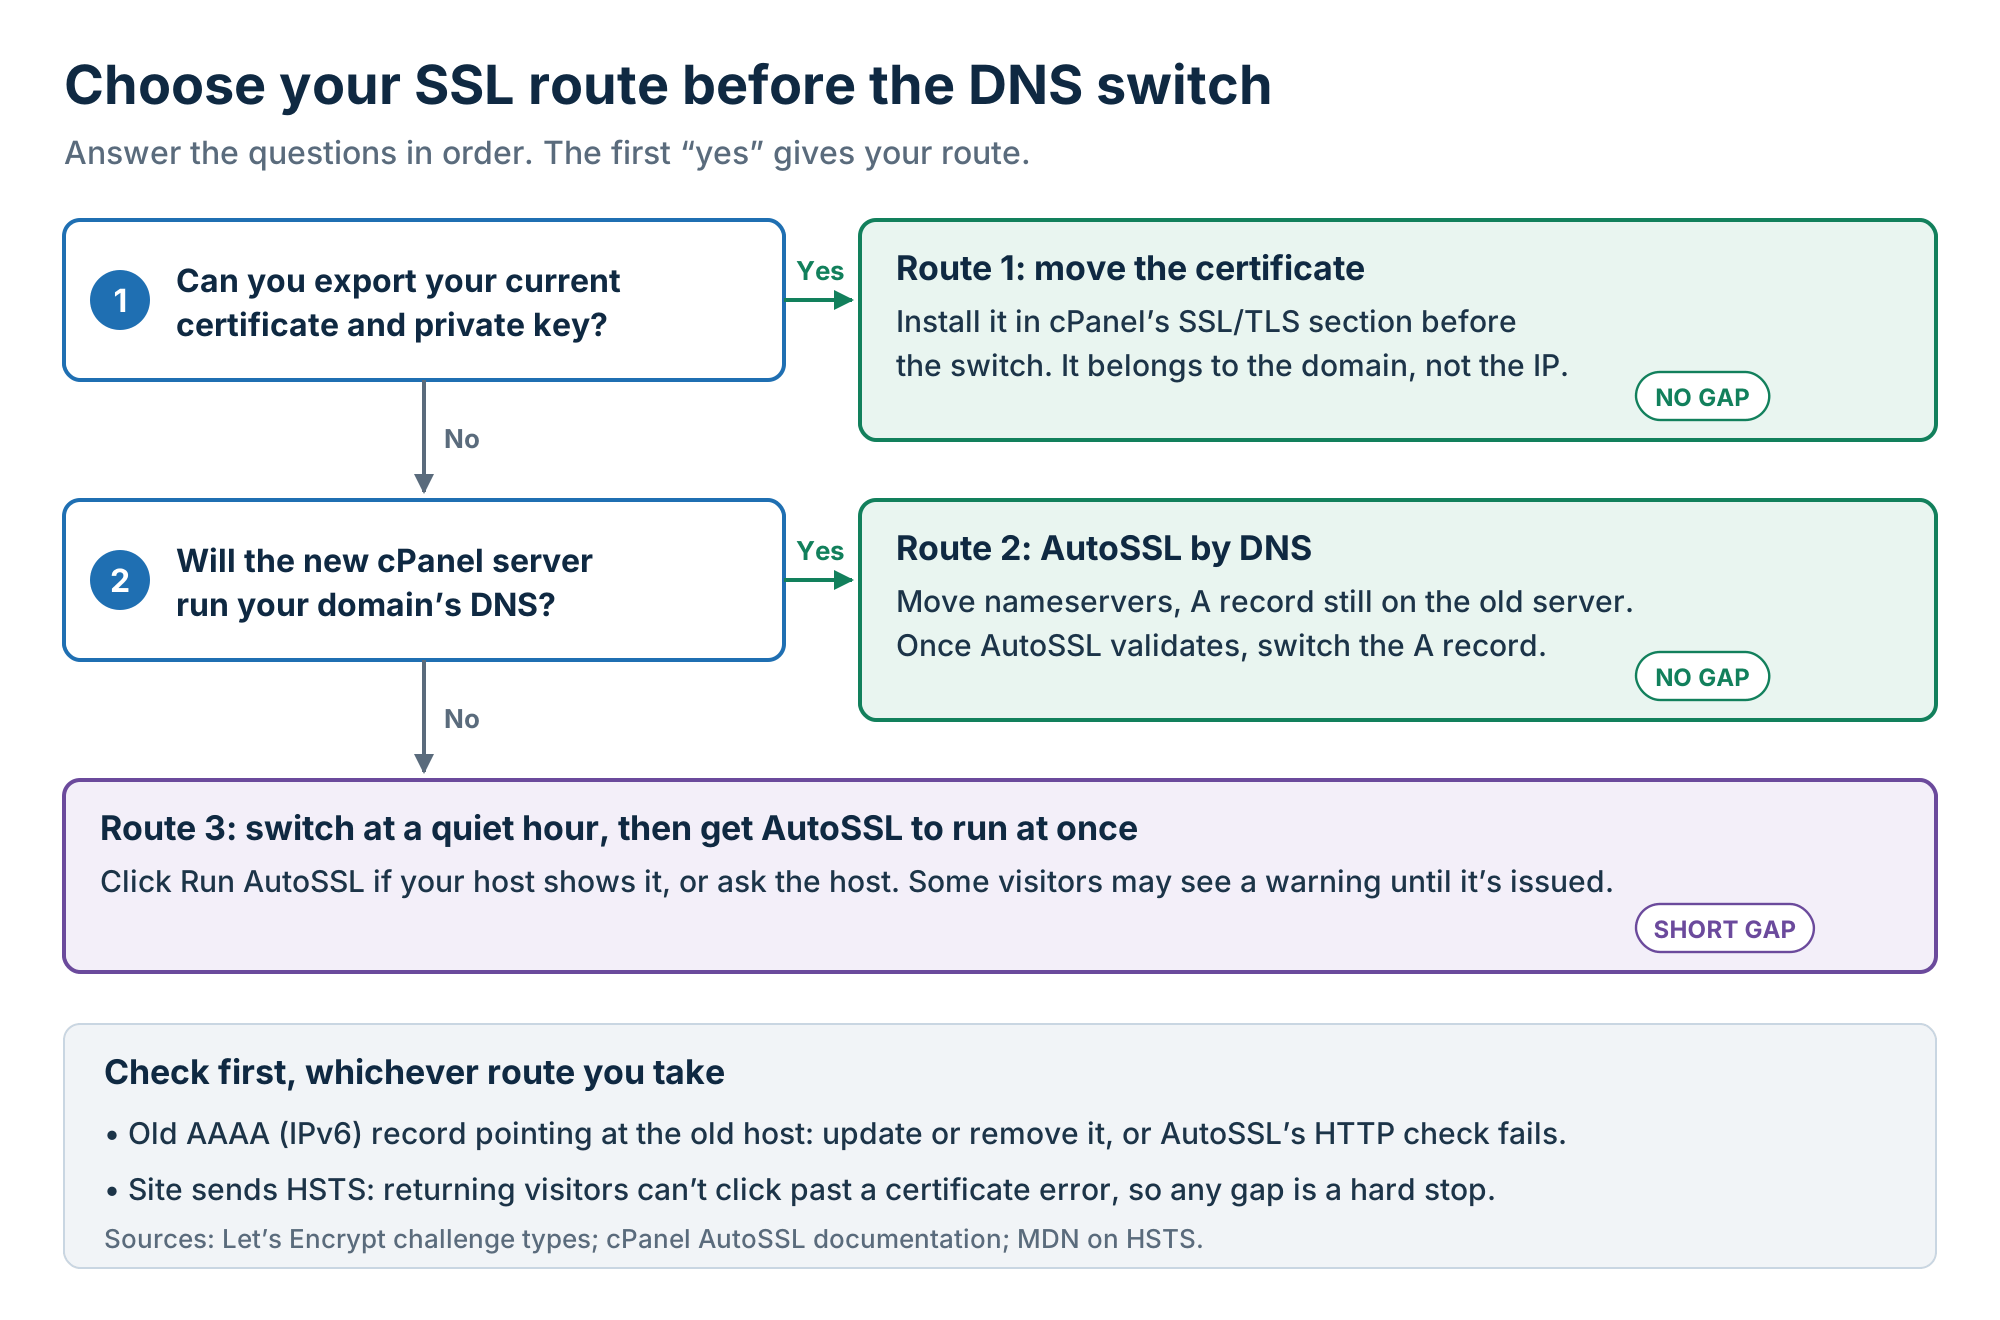 Figure 5. Two questions decide your SSL route, and the checks on the right apply whichever route you take.
Two details turn a small gap into a hard stop. An old AAAA record (the IPv6 version of an A record) pointing at the old host makes AutoSSL’s HTTP check fail even when IPv4 is right. If your site sends HSTS, a header telling browsers to accept only secure connections, returning visitors get no option to click past a certificate error. Once the certificate is live, fixing mixed content and forcing HTTPS are separate jobs for after the move.
A Record or Nameservers? Don’t Break Your Email
Changing only the A record moves the website and, after one check, leaves email where it is. Changing nameservers hands the whole DNS zone, every record for your domain, to the new host. For most moves, the A record is safer, because only the website’s address changes and everything else stays with your current DNS host.
An A record maps your domain to a server’s IPv4 address. When you change it at your current DNS host, your MX records (which tell other servers where to deliver your email) stay put. So do the TXT records for SPF, DKIM, and DMARC that show your mail is legitimate, and verification records for services such as Google.
The check is where your MX record points. Find the MX row in Zone Editor or your DNS host’s records page (screens vary). On many cPanel zones, it points to the domain itself or to mail. plus your domain, which follows the website’s address, so switching that address would move your mail too. If yours does, make the mail host (such as mail.example.ca) an A record with the old server’s IP, a TTL ahead, and point the MX record at it. Delete any CNAME row with that name first. WordPress then sends mail from the new server, so edit your SPF record, the TXT record starting with v=spf1. Add the new server’s IP as an ip4: value, such as ip4:203.0.113.10, before the ~all or -all at the end, and keep a single SPF record for the domain.
A nameserver change is bigger. The new provider starts answering for every record, so anything you haven’t recreated there stops working, including mail. Rebuild the zone from the records you exported during the audit before you switch. The change can take up to 24 hours at the registrar, and the nameserver TTL isn’t yours to lower. If DNSSEC is on, remove the DS records at the registrar first; cPanel’s documentation warns this can take up to 72 hours.
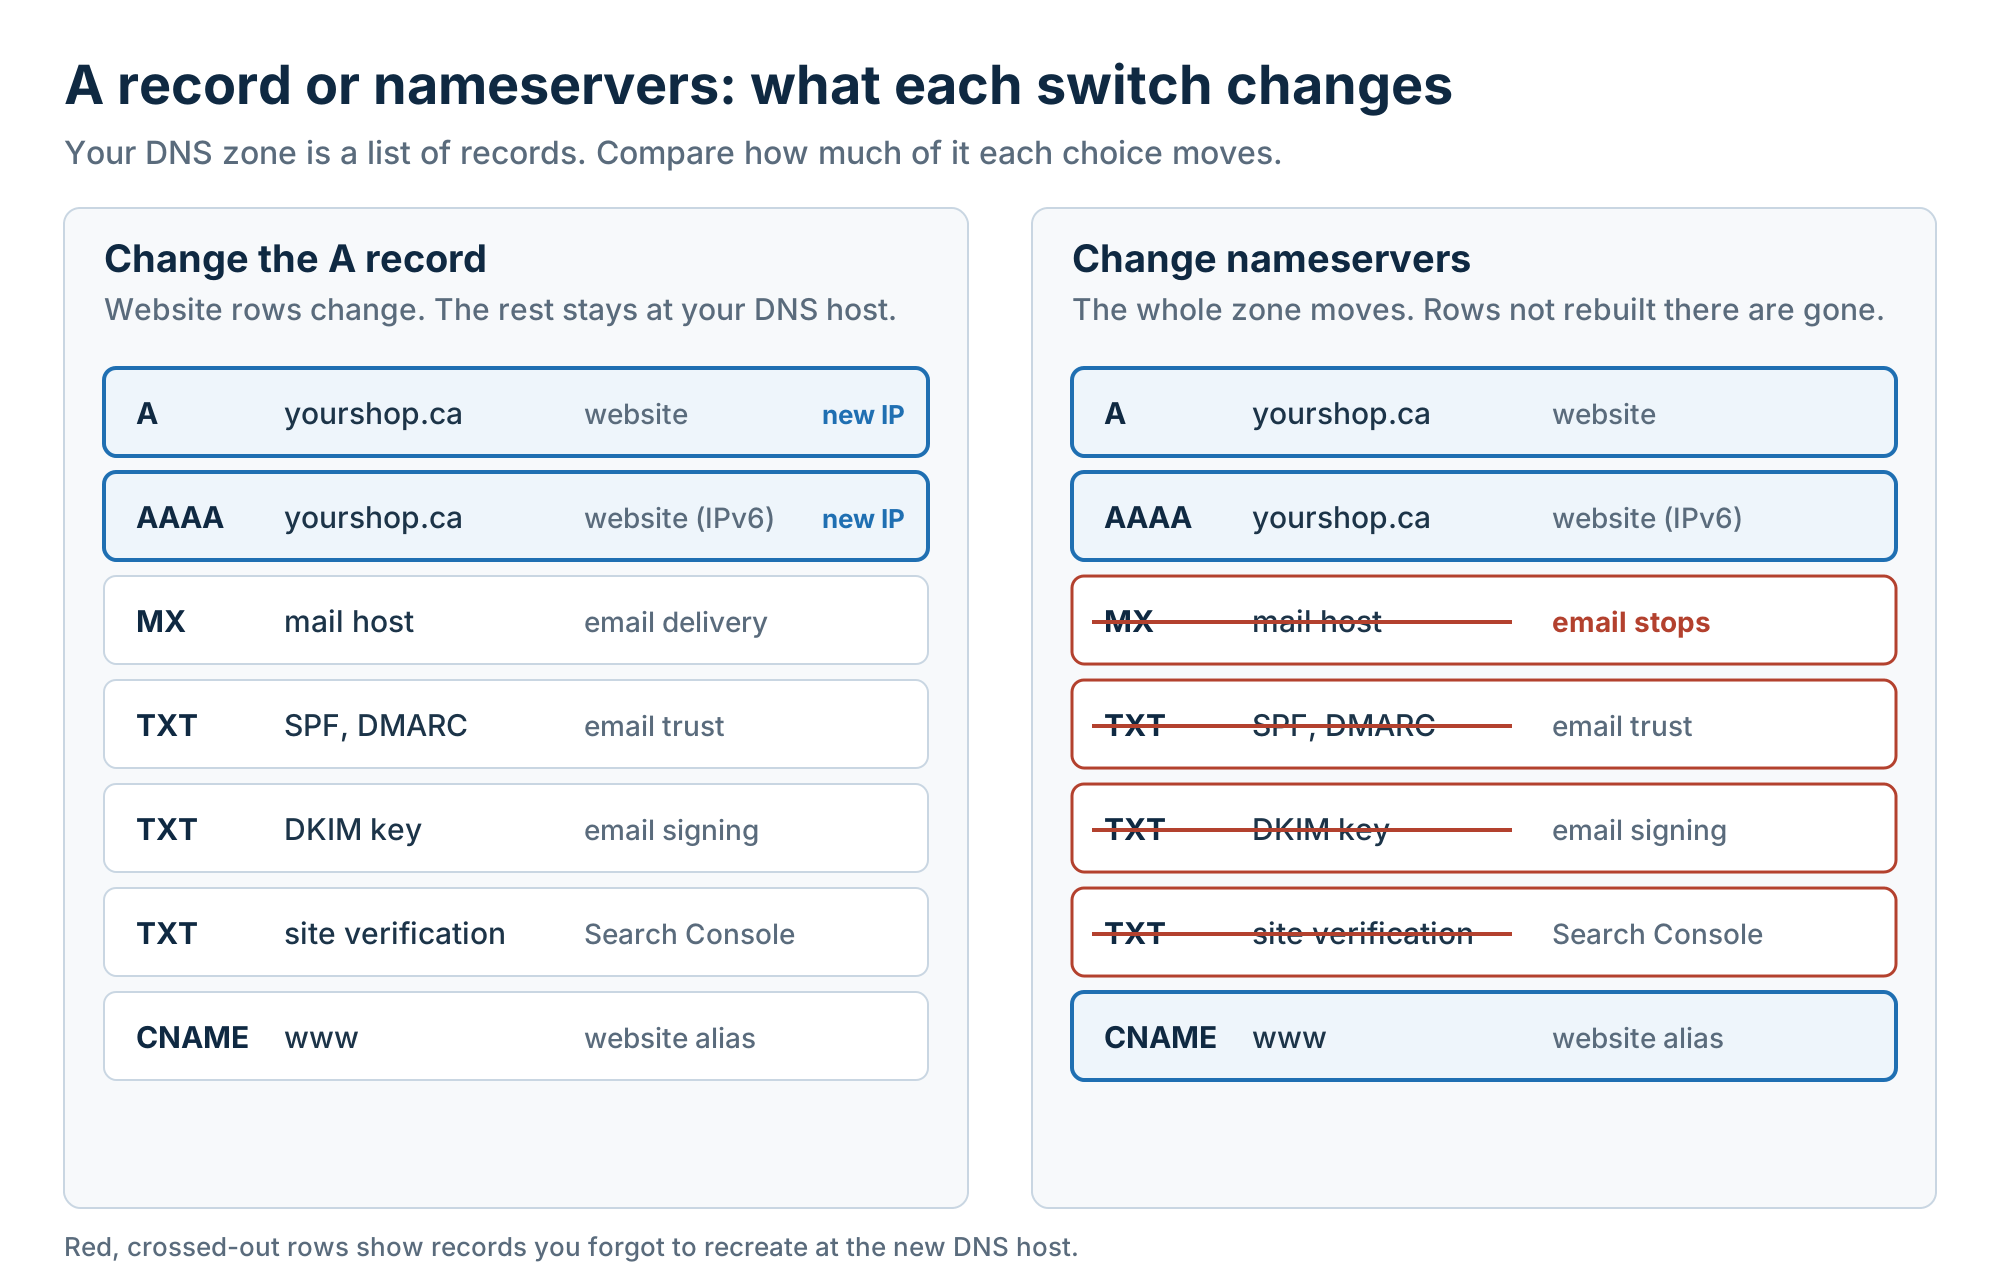 Figure 6. An A-record switch touches only the website’s address rows; a nameserver switch replaces the whole zone, so every record has to exist at the new host first.
Even with only the A record changed, WordPress’s own email can go missing. A new cPanel account decides whether it’s the mail server for your domain through a setting called Email Routing. On automatic, it reads only its own local zone, not live DNS. If that zone still has default MX records, routing is set to Local, and the emails WordPress sends to addresses at your own domain land in a mailbox nobody reads. Open Email Routing in cPanel’s Email section, select your domain, choose Remote Mail Exchanger while mail is hosted elsewhere (including the old server), and save. Switch it to Local once your mailboxes live on this account, and send a test form after each change.
If your mailboxes live on the old host, moving them is required, because cancelling the old plan about a week after the switch deletes them. Move them to the new host or a separate email service first. Create the same addresses (Email Accounts in cPanel), then copy the messages over IMAP (the protocol that keeps mail on the server) with a mail app, or ask support to do it. Change the MX record or mail host’s A record last, a few days after the website switch so the two changes stay separate, and update SPF to match.
Your Zero-Downtime Cutover Checklist and Rollback Plan
The whole move fits between about two days before the switch and about a week after it. The checklist is the plan, and the rollback rules after it are your Plan B. Copy both into a shared document, so nobody works from memory on the day.
The Cutover Checklist: Don’t Move On Until Each Check Passes
Table 2 runs from the first preparation day to the day you cancel the old plan, and at each stage it puts the website, orders, email, and SSL steps side by side. Each row ends with a check that must pass before you move to the next stage. If a check fails, stop and fix it there, because a problem found before the switch costs minutes, while the same problem found after it can cost orders or mail.
Google’s guide says to shut down the old hosting once its traffic reaches zero, which can take several days, so a week is a safe plan. You may see 72 hours suggested elsewhere. With a low TTL, DNS has usually settled within hours or a day, so 72 hours covers the switch, while the extra days keep a way back open.
When to Roll Back, and How to Do It Safely
Roll back when you don’t know what’s causing a problem, or when customers can’t pay. The usual triggers are failed checkouts or payments, errors on main pages, a certificate error you can’t clear quickly, and mail that has stopped arriving. Fix forward, on the new server, when the cause is known and quick to fix. A slow page or a broken widget isn’t usually a reason to go back. Write your triggers down before the switch, so you aren’t weighing them at midnight.
If the new server hasn’t taken orders or form entries, point the A record back at the old server and lift the freeze there if it’s still on. Visitors return as fast as they left while the TTL is still 300 seconds, which is why it goes back up only two days after the switch. If the new server has taken orders or entries, freeze it first, copy those rows back using the delta-sync tables (or ask your developer or host), then lift the freeze on the old server.
After the Move: Protect Your Rankings and Check Speed
A host move that keeps the same URLs shouldn’t affect your rankings, provided Google can reach the new server and nothing left over from testing blocks it. Google’s guidance on changing web hosts lists the checks. Remove any noindex tag, the “Discourage search engines” setting in WordPress, or robots.txt Disallow rule carried over from testing. Keep the Search Console verification file or meta tag on the new server, and make sure a firewall or bot protection isn’t blocking Googlebot.
Some change in Google’s behaviour is normal. Google expects a temporary dip in how often Googlebot crawls your site after a hosting change, followed by a steady increase over the next few days. Search Console’s Crawl stats report, under Settings, shows it, along with any server errors Google ran into.
Speed is the other check. Rebuild your page cache on the new server (see rebuilding LiteSpeed Cache on the new server if your host uses it), and purge any CDN. Compare time to first byte (TTFB), the time the server takes to start sending a page, from before the move with after it. The web.dev TTFB guide gives 0.8 seconds or less as a rough threshold for a good TTFB. Turn on uptime monitoring and check the PHP error log daily for the first week, since some problems appear only when a scheduled task runs.
Why Move Your WordPress Site to N6 Cloud?
N6 Cloud, a Canadian company based in British Columbia, sells the WordPress hosting described here, so read this section as the host’s own case. Every WordPress Hosting plan includes free website migration: open a ticket with your site details, and the team moves the site for you. Support is available 24/7 throughout the move. When you migrate WordPress to a new host with the team’s help, the timeline above still tells you when to lower the TTL and when to switch.
Several hard parts of this guide are built into the plans. AutoSSL installs and renews free certificates automatically on every plan, and daily backups are kept for up to 30 days, ready to restore from cPanel. Softaculous WordPress Manager handles one-click installs and updates, and its cloning and staging let you test changes on a copy first. Its backups also make Option B possible if your old host used Softaculous. You can choose PHP 7.4 or 8.0 to 8.5 on every server, so the new server can match the old one on day one and move up a version once the site is settled. Managed WordPress Hosting plans also include WP Toolkit for backups, cloning, and staging, and WP-CLI in cPanel’s Terminal for the manual route in Option C.
The servers are in British Columbia, and your files, databases, and backups stay in Canada, close to Canadian visitors. The team has more than 20 years in web hosting, and plans carry a 99.9% uptime guarantee. WordPress Hosting also includes free Cloudflare CDN integration, which serves your site’s images, styles, and scripts from locations closer to each visitor. Every plan’s features and limits are listed side by side on the page for Canadian WordPress hosting with daily backups, so you can pick the right plan before you open your migration ticket.